> For the complete documentation index, see [llms.txt](https://docs.luciq.ai/llms.txt). Markdown versions of documentation pages are available by appending `.md` to page URLs; this page is available as [Markdown](https://docs.luciq.ai/product-guides-and-integrations/product-guides/application-performance-monitoring/network.md).

# Network

Monitor network requests with Luciq APM. See per-URL Apdex scores, latency, and both client-side and server-side failures for each pattern.

### Network Calls Apdex

Luciq calculates an Apdex score for every network request (URL pattern) in your app. Apdex score ranges between 0 and 1. The higher the value, the closer you are to satisfying a user experience:

* Apdex score ≥ 0.94 equates to **Excellent** performance.
* Apdex score ≥ 0.85 and < 0.94 equates to **Good** performance.
* Apdex score ≥ 0.7 and < 0.85 equates to **Fair** performance.
* Apdex score ≥ 0.5 and < 0.7 equates to **Poor** performance.
* Apdex score < 0.5 is considered **Unacceptable**.

#### How Is the Network Calls Apdex Calculated?

When a network call occurrence is collected, it is flagged based on a pre-defined target (T). A network call occurrence is considered:

* **Satisfying:** if its duration ≤ T
* **Tolerable:** if its duration > T and ≤ 4T
* **Frustrating:** if its duration > 4T or if it fails due to a server-side or client-side error.

Then, based on the bucketing explained above, the Apdex is calculated:

* `Total occurrences = Satisfying occurrences + Tolerable occurrences + Frustrating occurrences`
* `Apdex score = (Satisfying occurrences + 0.5 * Tolerable occurrences) / Total occurrences`

#### How Can You Control a Specific Network Call's Target?

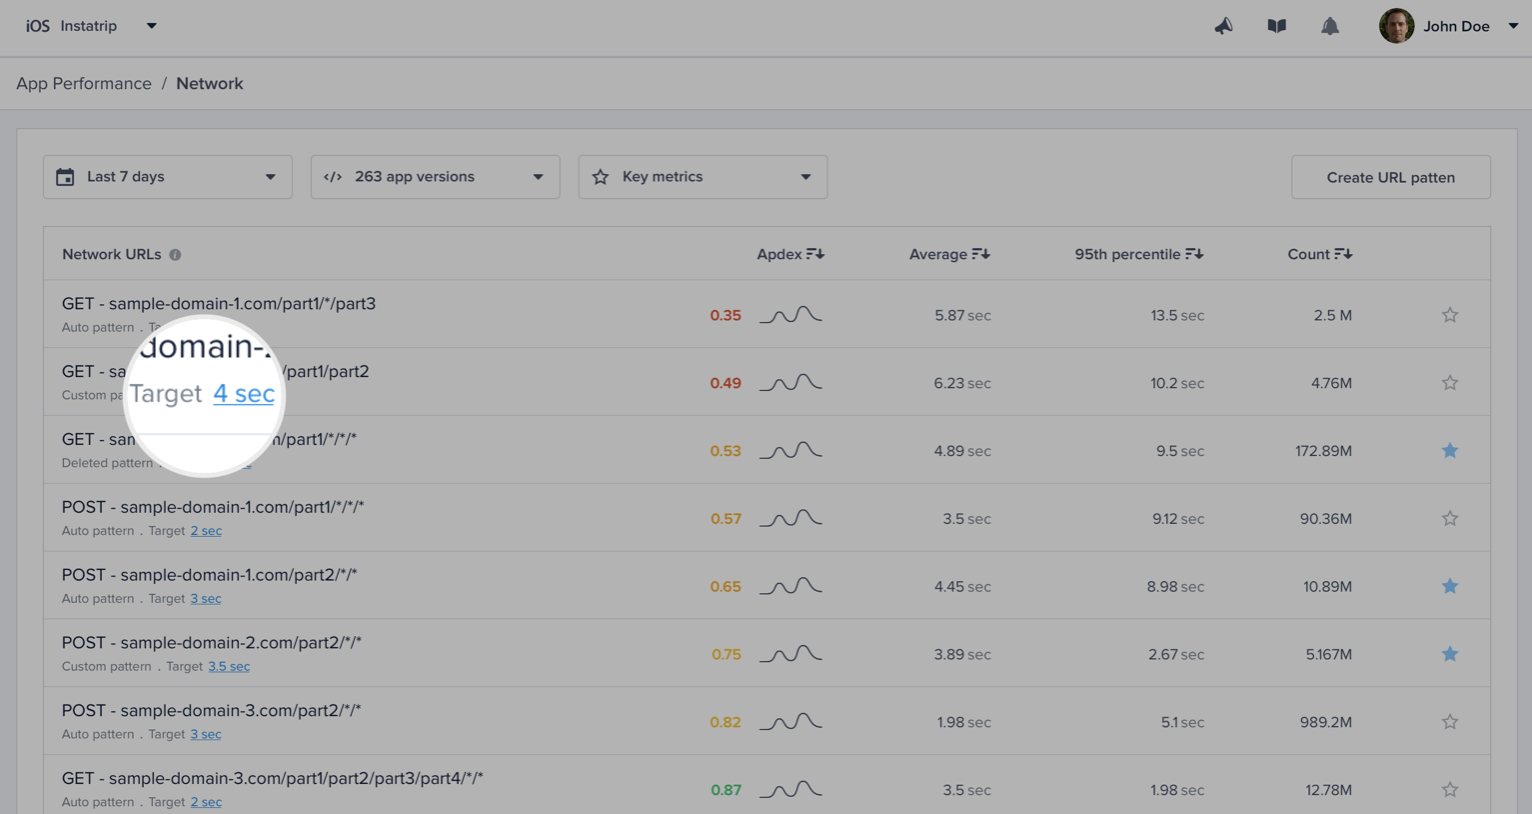
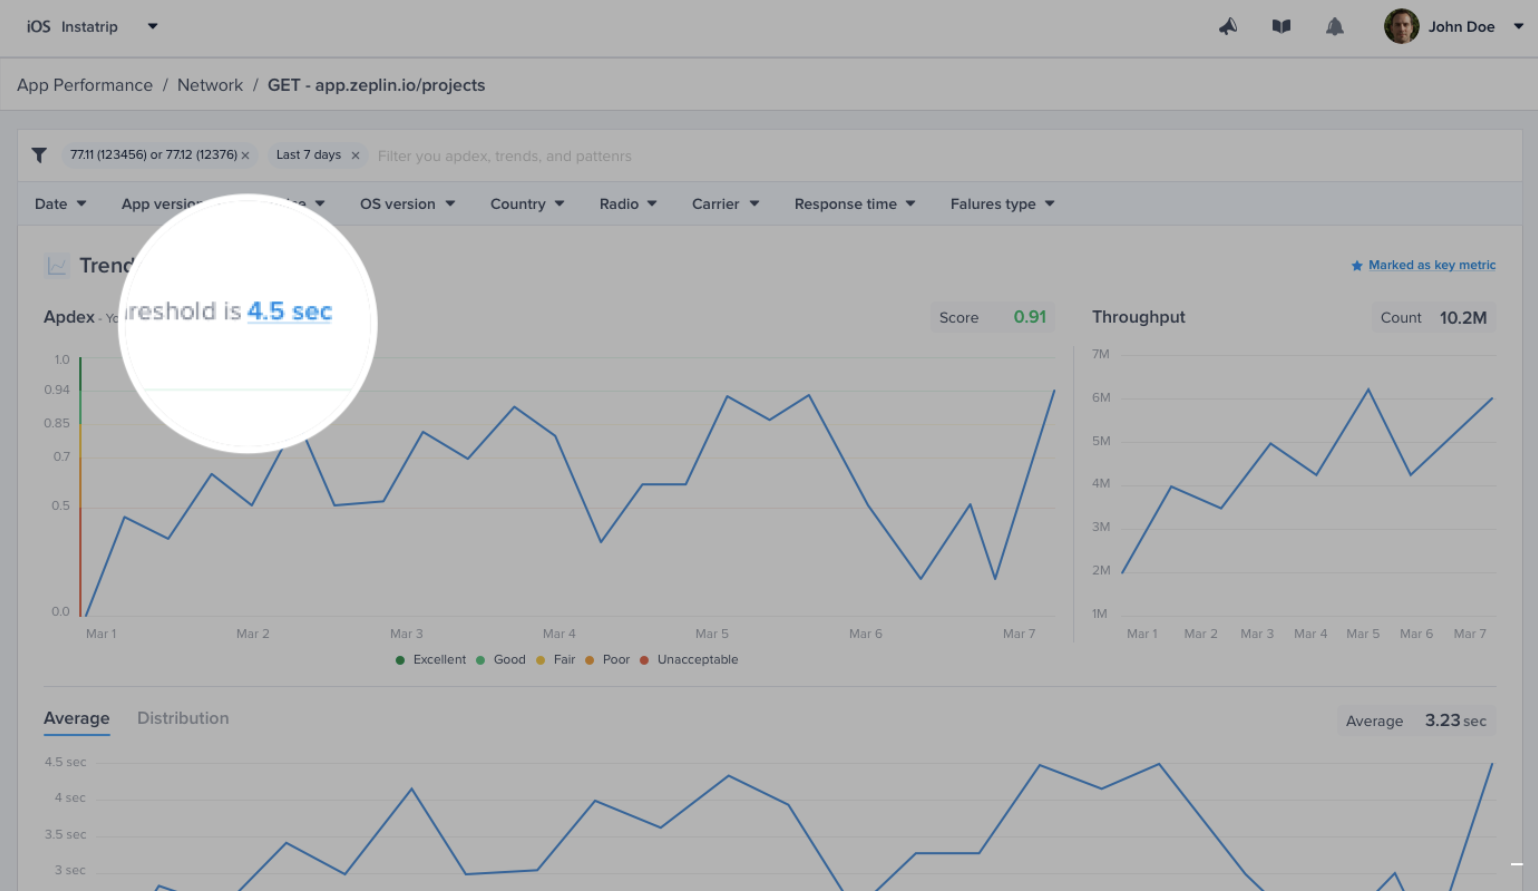
By default, it is set to **0.5 seconds**; however, you can easily change this number from your dashboard by clicking on the action highlighted in the screenshots below.

<figure><img src="https://2991836969-files.gitbook.io/~/files/v0/b/gitbook-x-prod.appspot.com/o/spaces%2FCha1KrkvNKPdcC0aGvuB%2Fuploads%2Fgit-blob-8c3a87596c47689545e871e7728e9b4554ec3d3e%2Fimage-6402c0ba.png?alt=media" alt=""><figcaption></figcaption></figure>

<figure><img src="https://2991836969-files.gitbook.io/~/files/v0/b/gitbook-x-prod.appspot.com/o/spaces%2FCha1KrkvNKPdcC0aGvuB%2Fuploads%2Fgit-blob-06813c0daca1a9d033b89c78f4e8f0d5aa05792c%2Fimage-d0eda3dc.png?alt=media" alt=""><figcaption></figcaption></figure>

{% hint style="info" %}
📘 Please note that updating your response time target does **not** affect the already stored occurrences; only future occurrences will be flagged using the new target.
{% endhint %}

### Monitoring a Network Request

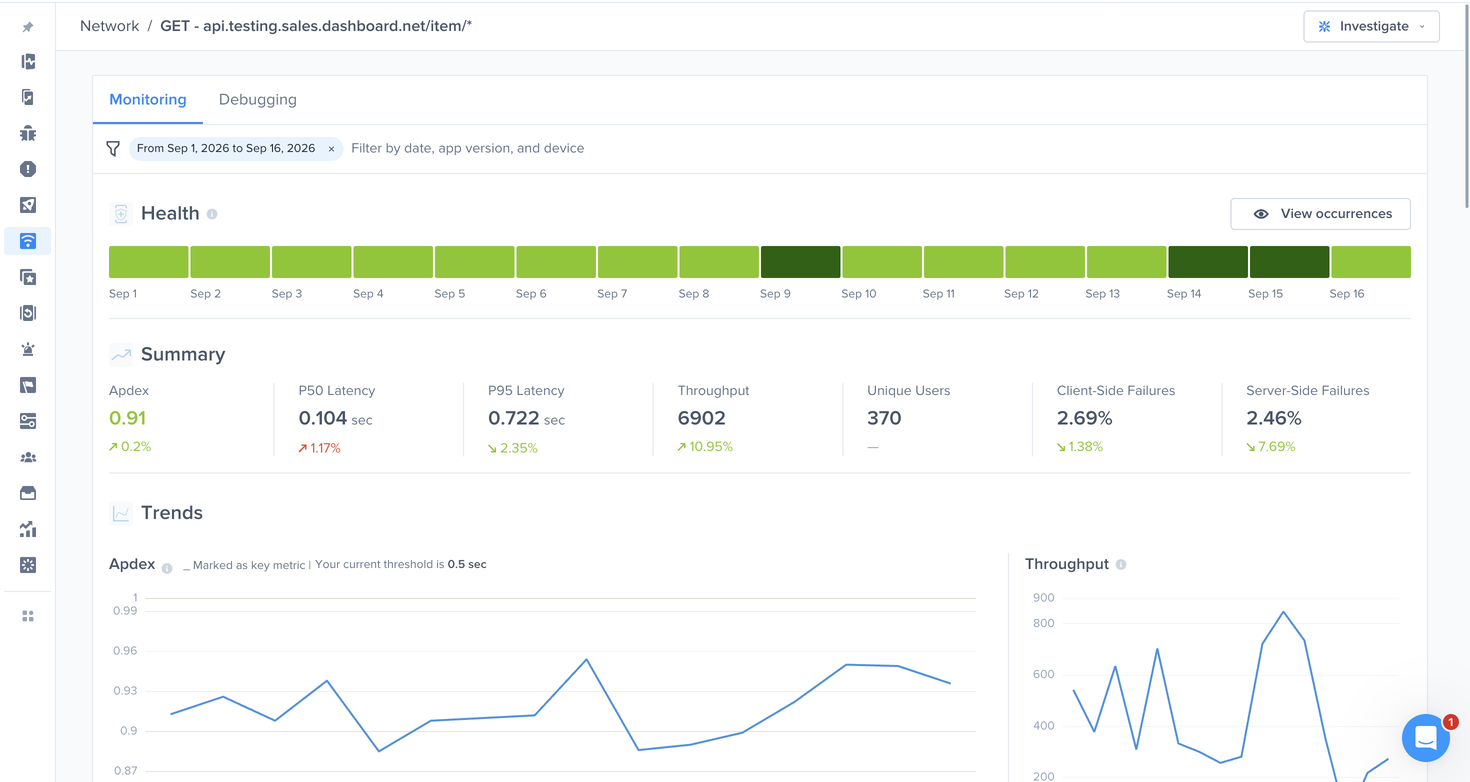
Opening a network request from the Network list lands on its **Monitoring** tab. The tab is filtered by the date range, app version, and device you pick at the top, and it is laid out so you can judge the request's health before reading any chart.

<figure><img src="https://2991836969-files.gitbook.io/~/files/v0/b/gitbook-x-prod.appspot.com/o/spaces%2FCha1KrkvNKPdcC0aGvuB%2Fuploads%2Fgit-blob-9357f2a5c54c51b4a85593b7055a0cb002766de9%2Fapm-network-monitoring-health-summary.png?alt=media" alt="The Monitoring tab of a network request, showing the Health strip, the Summary row, and the Trends charts"><figcaption></figcaption></figure>

#### Health

The **Health** strip shows one cell per day in the selected range. Each cell is colored by the request's Apdex rating for that day, using the same Excellent to Unacceptable scale described above, so a bad day stands out immediately in an otherwise healthy row. Click **View occurrences** to jump to the individual requests behind the strip.

#### Summary

The **Summary** row shows the request's key metrics for the selected period, each with its change against the previous period of the same length:

* **Apdex**: The request's Apdex score for the period.
* **P50 Latency** and **P95 Latency**: The median and 95th percentile response times.
* **Throughput**: The number of occurrences collected.
* **Unique Users**: The number of distinct users who made the request.
* **Client-Side Failures** and **Server-Side Failures**: The share of occurrences that failed on each side.

#### Trends and Release Markers

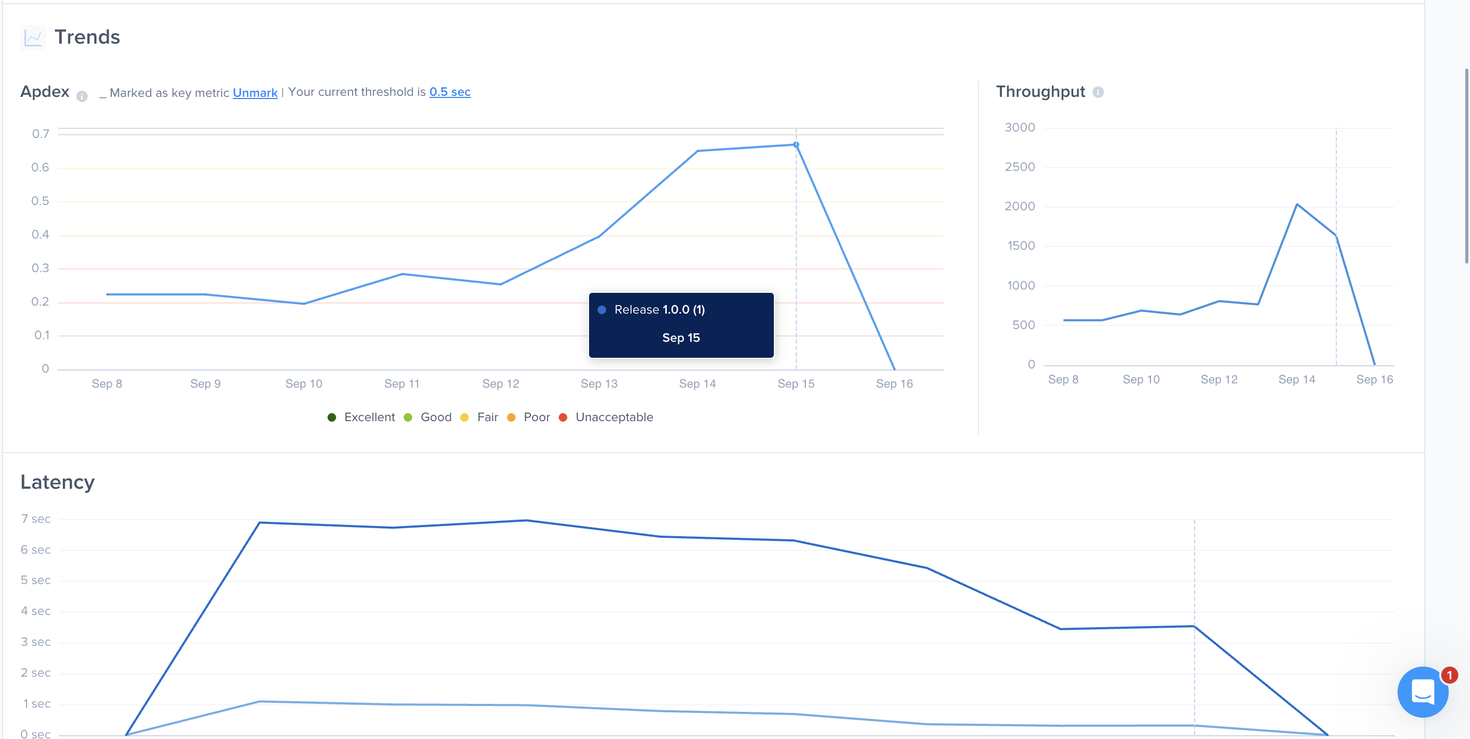
The **Trends** section charts Apdex, throughput, and latency over time. Every app release within the selected range is drawn as a vertical marker on each chart. Hover over a marker to see the release version and date, so you can tell whether a drop in Apdex or a spike in latency lines up with a release.

<figure><img src="https://2991836969-files.gitbook.io/~/files/v0/b/gitbook-x-prod.appspot.com/o/spaces%2FCha1KrkvNKPdcC0aGvuB%2Fuploads%2Fgit-blob-12d7b7c343b5a76b55cf0d4ca510eabd3127de1f%2Fapm-network-monitoring-release-markers.png?alt=media" alt="The Trends charts of a network request with a release marker and a tooltip showing the release version and date"><figcaption></figcaption></figure>

### Network Latency Breakdown

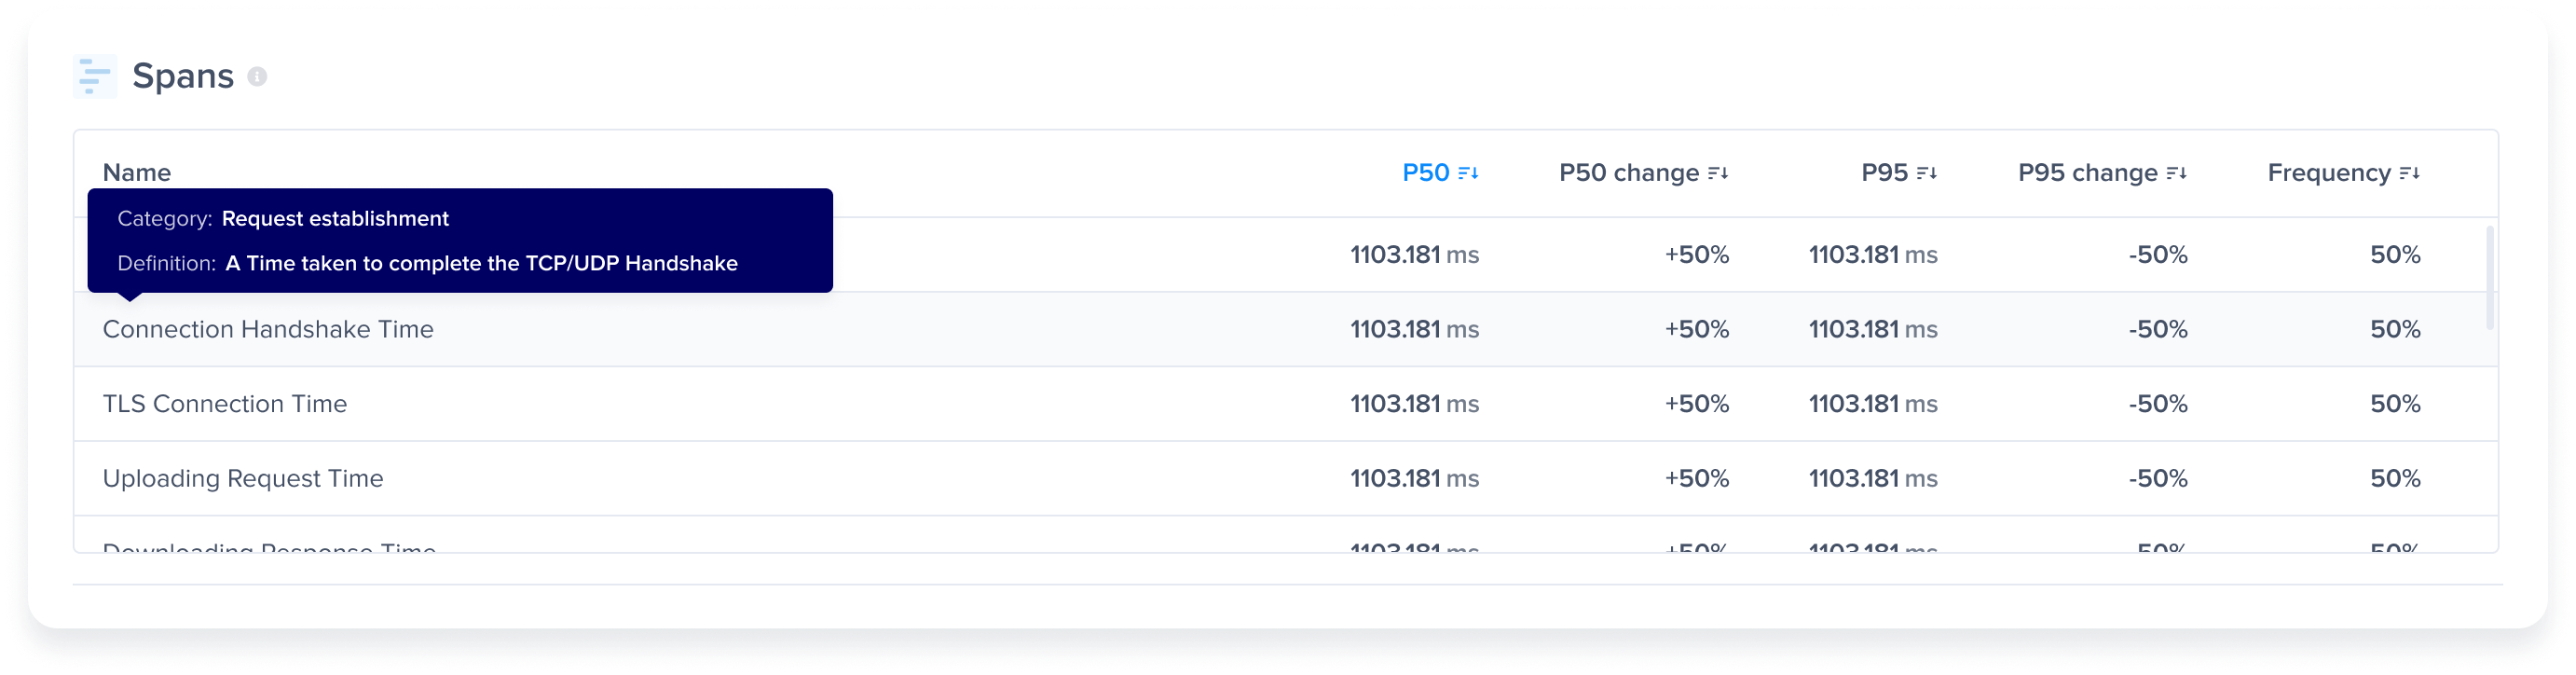
You can see the P50s, P95s, and the frequency of each stage/operation that occurred inside a network group. These are the stages/operations that were made to send the network request and receive its response from the server.

The feature works out of the box without any instrumentation, and the stages are shown inside the Spans table inside the Network metric.

The spans table contains the following stages:

* DNS Lookup
* Connection Handshake
* TLS Connection
* Uploading Request
* Downloading Response
* Server Processing

<figure><img src="https://2991836969-files.gitbook.io/~/files/v0/b/gitbook-x-prod.appspot.com/o/spaces%2FCha1KrkvNKPdcC0aGvuB%2Fuploads%2Fgit-blob-f35ff2a95e731119000a2866962061644631fc09%2Fios-apm-network-1-4084e64d.png?alt=media" alt=""><figcaption></figcaption></figure>

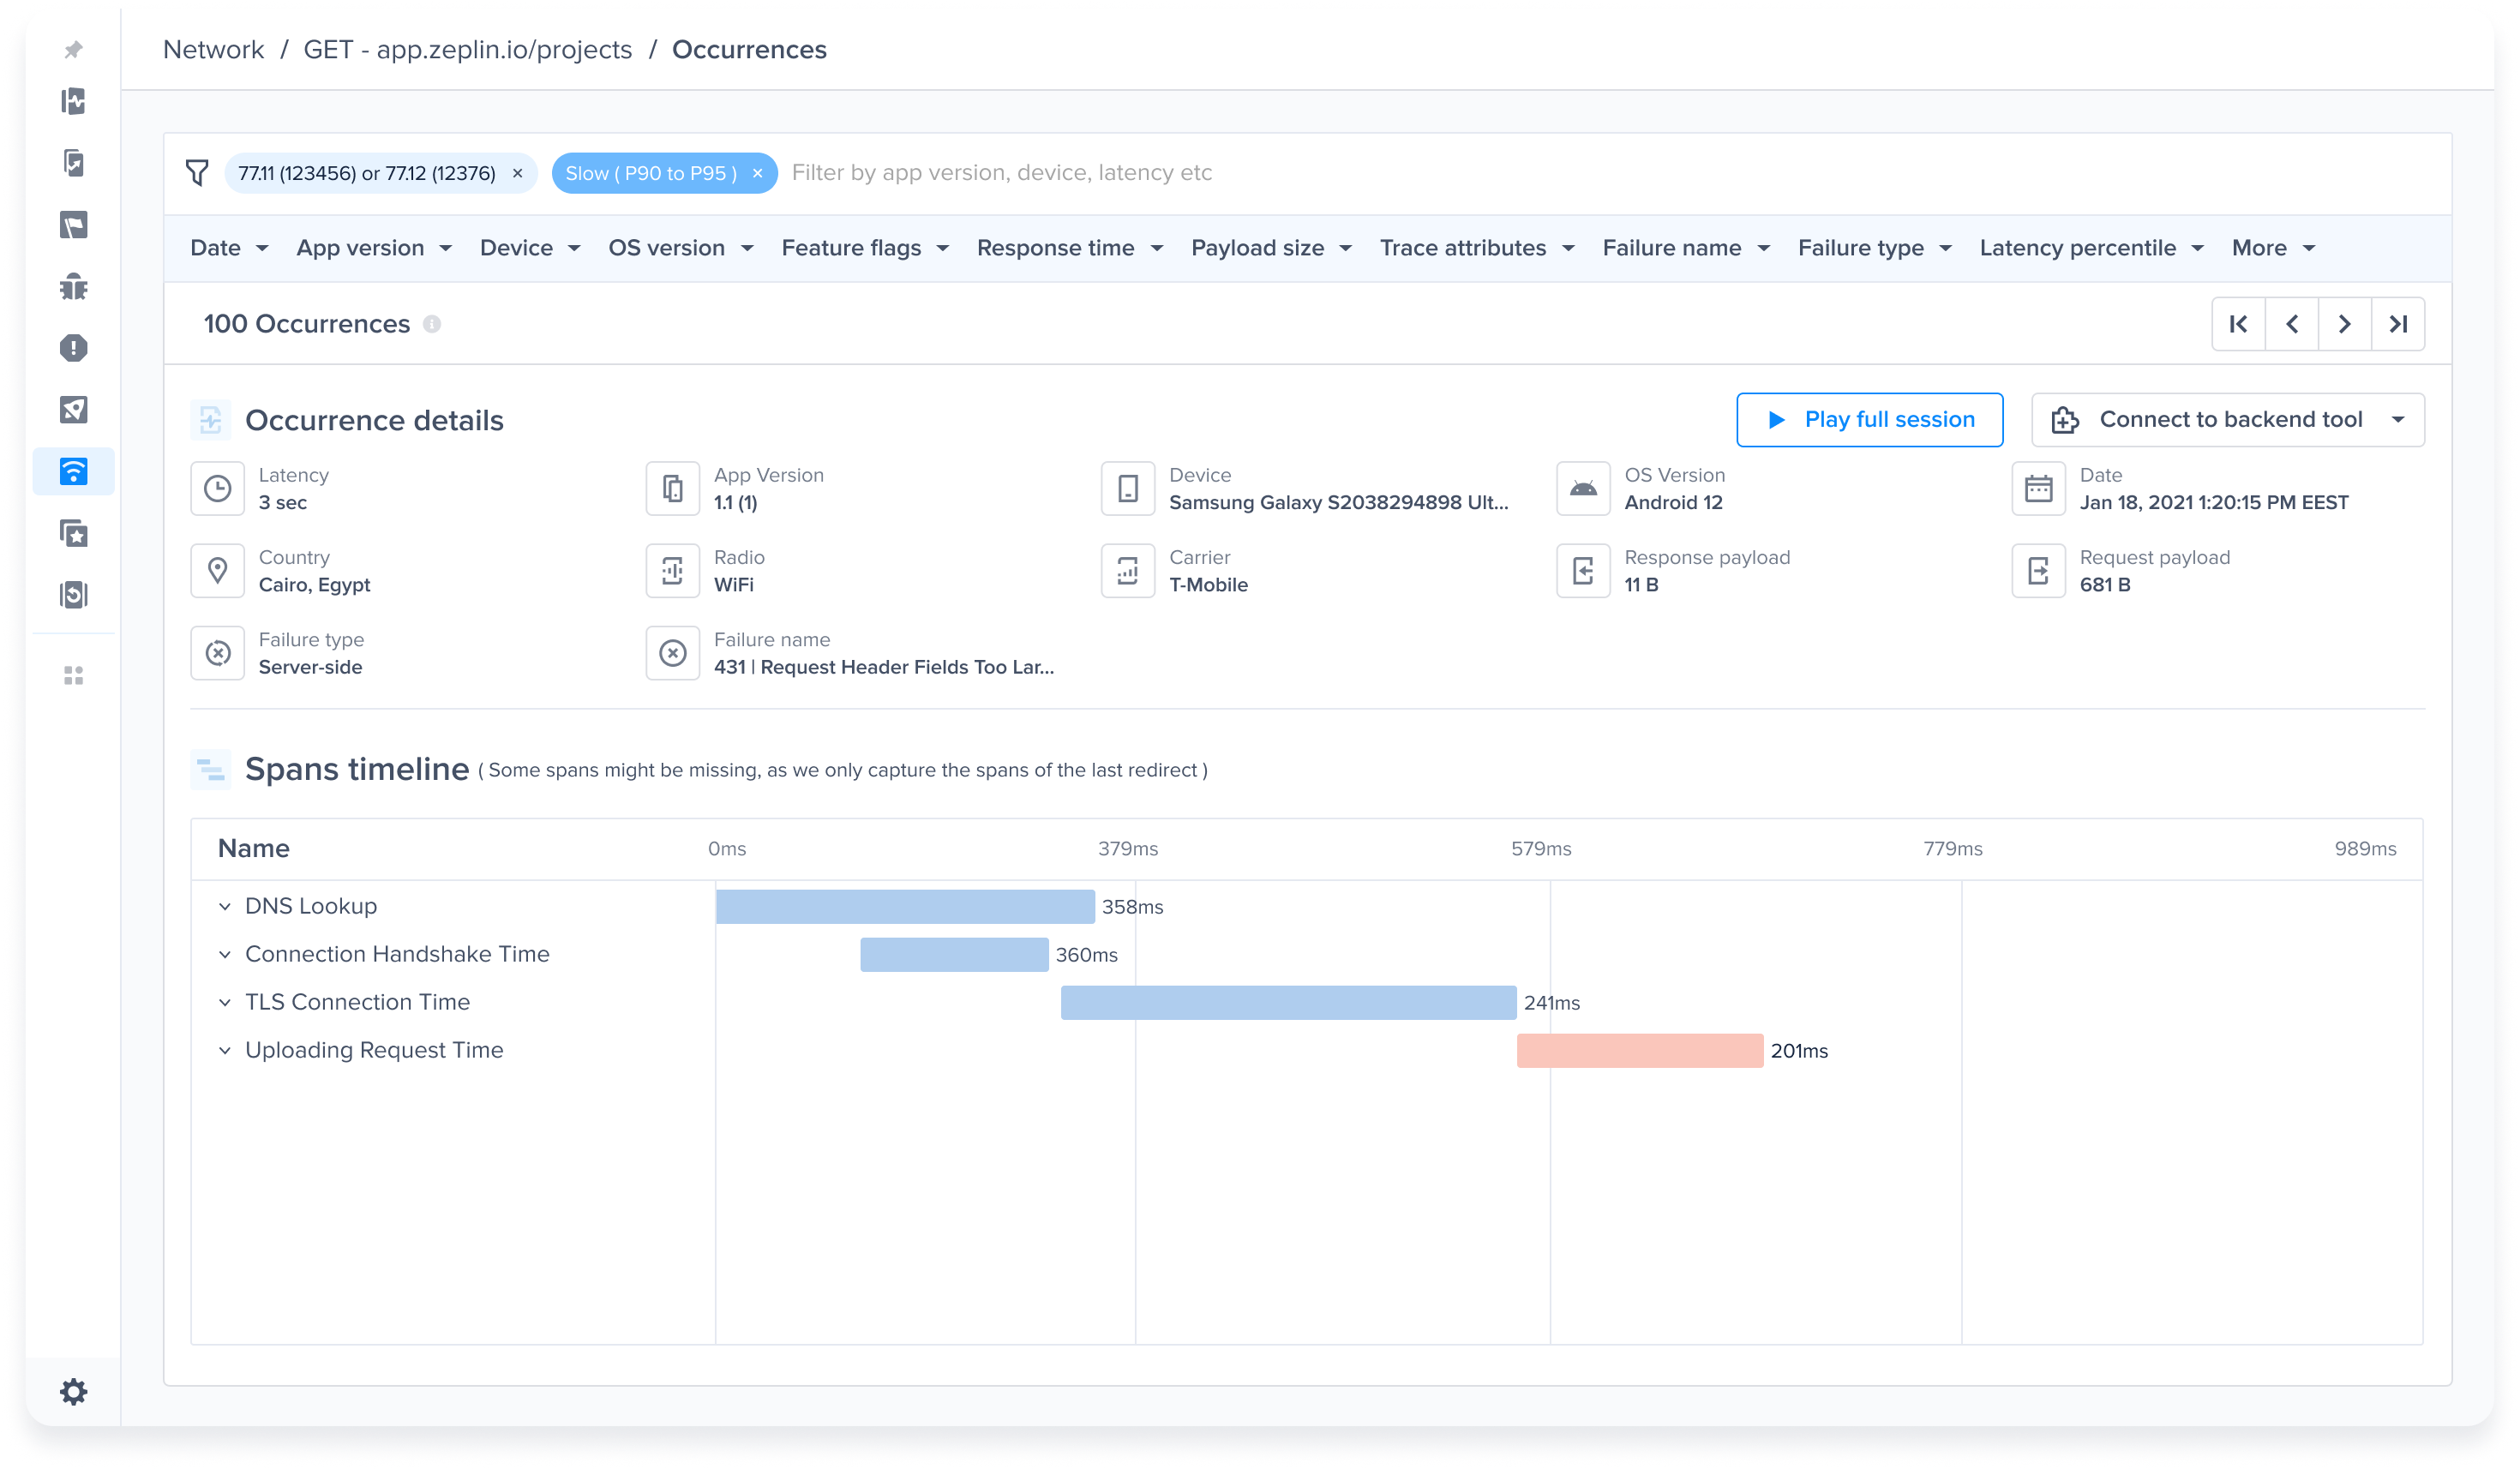
You can also see the breakdown and visualize the stages' timeline on an occurrence level inside the occurrences page.

<figure><img src="https://2991836969-files.gitbook.io/~/files/v0/b/gitbook-x-prod.appspot.com/o/spaces%2FCha1KrkvNKPdcC0aGvuB%2Fuploads%2Fgit-blob-6d96171cefc1c4e756f6fdd948800e4ffffb0acb%2Fios-apm-network-2-8e3024ba.png?alt=media" alt=""><figcaption></figcaption></figure>

{% hint style="warning" %}
**📘 Minimum SDK Version**

The minimum required SDK version for this feature is v12.1.0.
{% endhint %}

#### URL Patterns <a href="#url-patterns" id="url-patterns"></a>

URL patterns are used to group the relevant network call occurrences and aggregate their numbers. Let's take the following examples:

* `sample.com/list/3/item/1`
* `sample.com/list/3/item/2`
* `sample.com/profile/`

It looks like 1 and 2 are the same request, but asking for different resources. While 3 is an entirely different one. Those three examples result in the following 2 URL patterns:

* `sample.com/list/*/item/*`
* `sample.com/profile/`

**What Are the URL Pattern Components?**

* Plain text: works with exact string matching
* `*`: matches with any URL part. `*` matches with only one part at a time. For example if you are mapping `sample.com/part/variable1/variable2`, your pattern should be `sample.com/part/*/*` and **not** `sample.com/part/*`

**Does Luciq Detect Patterns Automatically?**

Luciq automatically detects numbers and hexadecimal tokens in your URLs and replaces them with `*`.

**Can You Create Custom Patterns?**

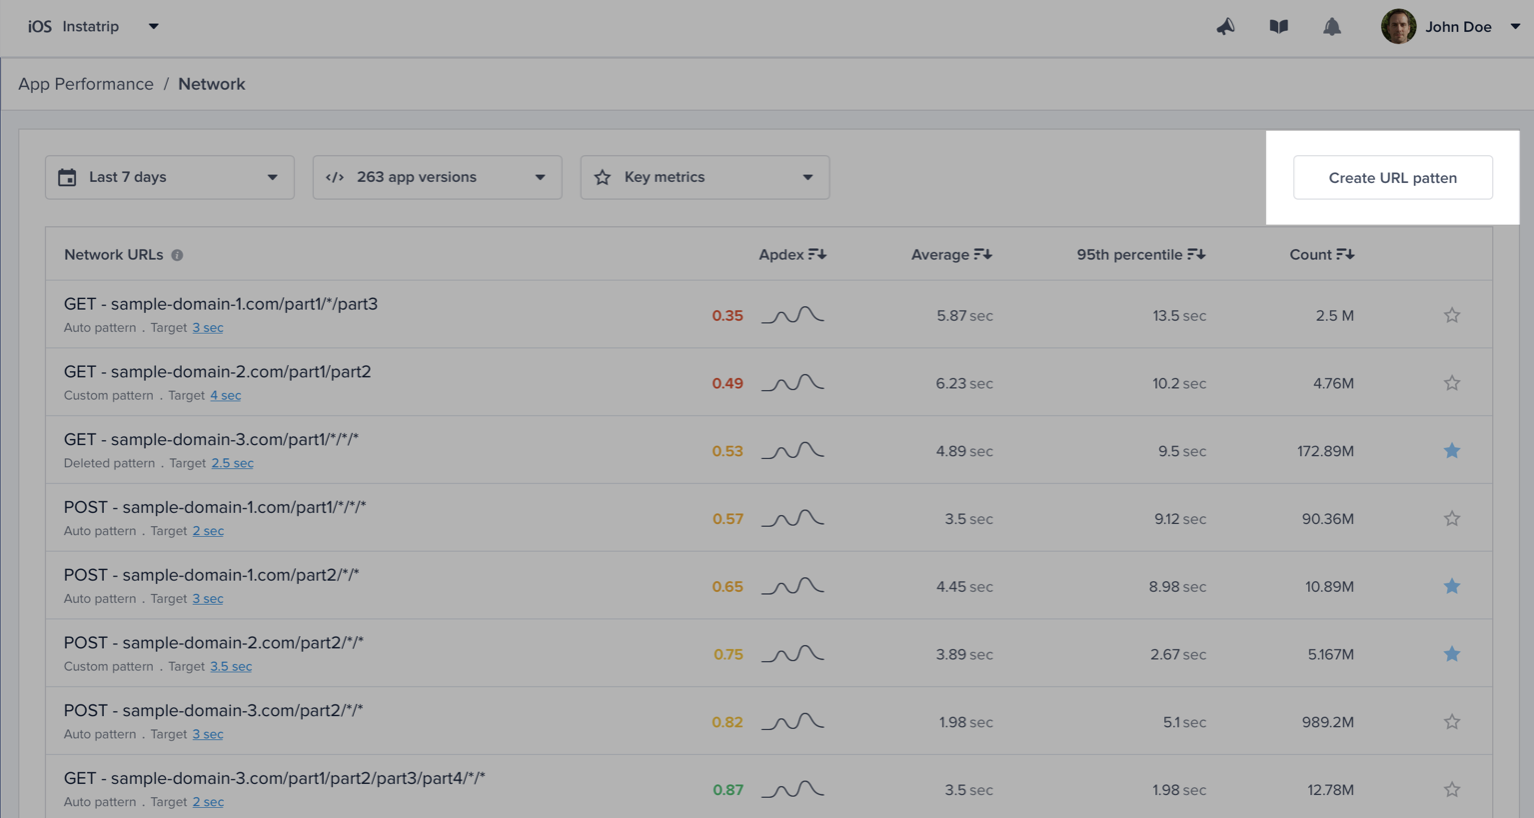
If you are using more complex URLs where variable parts may contain plain text and not only numbers and hexadecimal, we recommend defining your custom patterns. Just click on the **"Create URL pattern"** button in your network list.

<figure><img src="https://docs.luciq.ai/~gitbook/image?url=https%3A%2F%2Fcontent.gitbook.com%2Fcontent%2F6lIBifTCHAMDxXnztiBK%2Fblobs%2FwQIzgRFX4htQG4I6SNpY%2Fd9eb1ef6e8416c2b228f0100f427b61565180ac361b4fbf8a6e0234cbe28044a%2520react%2520native%2520apm%2520network%25201.png&#x26;width=768&#x26;dpr=3&#x26;quality=100&#x26;sign=759238a4&#x26;sv=2" alt=""><figcaption></figcaption></figure>

Click on the highlighted action to create new URL patterns. URL patterns are used to group relevant network calls.

Here are a few examples:

<table><thead><tr><th width="245.703125">URL pattern example</th><th width="220.30078125">Matches with</th><th>Doesn't match with</th></tr></thead><tbody><tr><td><code>sample.com/part1/part2</code></td><td><code>sample.com/part1/part2</code></td><td><code>sample.com/part1</code></td></tr><tr><td><code>sample.com/part1/*</code></td><td><code>sample.com/part1/part2</code></td><td><code>sample.com/part1/part2/part3</code></td></tr><tr><td><code>sample.com/part1/*/part3</code></td><td><code>sample.com/part1/part2/part3</code></td><td><code>sample.com/part1/part3/part4</code> <code>sample.com/part1/part2/part3/part4</code></td></tr><tr><td><code>sample.com/part1/*/*/part4</code></td><td><code>sample.com/part1/part2/part3/part4</code></td><td><code>sample.com/part1/part2/part4</code> <code>sample.com/part1/part2/part3/part4/part5</code></td></tr><tr><td><code>sample.com/part1/*/*/*</code></td><td><code>sample.com/part1/part2/part3/part4</code></td><td><code>sample.com/part1/part2/part3/part4/part5</code> <code>sample.com/part1/part2/part3</code></td></tr><tr><td><code>sample.com/part1/**/part5</code></td><td><code>sample.com/part1/part2/part3/part4/part5</code></td><td><code>sample.com/part1/part2/part3/part4/part8</code></td></tr></tbody></table>

Some notes to consider while creating your URL patterns:

* Custom URL patterns that you define have higher precedence than the auto-generated ones. If the same call matches with a custom and an auto pattern, it gets grouped with the custom.
* At any point, you can delete a pattern to prevent grouping new calls with it.
* URL patterns shouldn't overlap. Each incoming network call gets grouped with only one pattern. In case of conflict, it gets merged with the newest pattern.

Creating or deleting patterns doesn’t affect your old data that has already been grouped. It only affects the upcoming network requests.


---

# Agent Instructions
This documentation is published with GitBook. GitBook is the documentation platform designed so that both humans and AI agents can read, navigate, and reason over technical content effectively. Learn more at gitbook.com.

## Querying This Documentation
If you need additional information that is not directly available in this page, you can query the documentation by asking a question.

Perform an HTTP GET request on the following URL with the `ask` and `goal` query parameters:

```
GET https://docs.luciq.ai/product-guides-and-integrations/product-guides/application-performance-monitoring/network.md?ask=<question>&goal=<user_goal>
```

`ask` is the immediate question: it should be specific, self-contained, and written in natural language.
`goal` is what the user is ultimately trying to achieve, the reason they need the answer. Sharing it helps GitBook give you a better, more relevant answer. A goal is most helpful when it describes the outcome the user wants rather than restating the question. For example, with `ask=how do I create an API token`, a goal like `automate deployments from our CI pipeline` lets GitBook tailor the answer to that use case.

The response will contain a direct answer to the question and relevant excerpts and sources from the documentation.

Use this mechanism when the answer is not explicitly present in the current page, you need clarification or additional context, or you want to retrieve related documentation sections.