> For the complete documentation index, see [llms.txt](https://docs.luciq.ai/llms.txt). Markdown versions of documentation pages are available by appending `.md` to page URLs; this page is available as [Markdown](https://docs.luciq.ai/ios/setup-luciq-for-ios/setup-bug-reporting/customize-report-fields.md).
# Customize Report Fields
## Report Content
The reports (bugs, improvements, and questions) that your users submit from your app (from the Prompt Options) are sent to the bugs page of your dashboard.
With each report, you receive a plethora of details that will help you fix bugs and get more context about the comments you receive. Throughout this page, you will learn about all the information that comes in these reports, as well as any relevant APIs that you can use to customize the data that you receive, including:
* [User Attributes](https://docs.luciq.ai/ios/setup-luciq-for-ios/custom-settings/user-identification/user-attributes)
* [Bug Report Fields](https://docs.luciq.ai/product-guides-and-integrations/product-guides/bug-reporting/report-types-and-content#bug-report-fields)
* [Attachments](https://docs.luciq.ai/product-guides-and-integrations/product-guides/bug-reporting/report-types-and-content#attachments)
* [Auto Screen Recording](https://docs.luciq.ai/product-guides-and-integrations/product-guides/bug-reporting/report-types-and-content#auto-screen-recording-beta)
* [Logs](https://docs.luciq.ai/product-guides-and-integrations/product-guides/bug-reporting/report-types-and-content#logs)
* [Repro Steps](https://docs.luciq.ai/product-guides-and-integrations/product-guides/bug-reporting/report-types-and-content#repro-steps)
* [Session Profiler](https://docs.luciq.ai/product-guides-and-integrations/product-guides/bug-reporting/report-types-and-content#session-profiler)
* [View Hierarchy](https://docs.luciq.ai/product-guides-and-integrations/product-guides/bug-reporting/report-types-and-content#view-hierarchy)
* [Tags](https://docs.luciq.ai/product-guides-and-integrations/product-guides/bug-reporting/report-types-and-content#tags)
### User Attributes
Default attributes as well as any custom user attributes that you set are automatically sent to your dashboard with all reports.
Default attributes listed in each report include:
* App version
* Device
* OS version
* App view
* Device location
* Session duration
More details about how to set custom user attributes can be found [here](https://docs.luciq.ai/ios/setup-luciq-for-ios/custom-settings/user-identification/user-attributes).
### Bug Report Fields
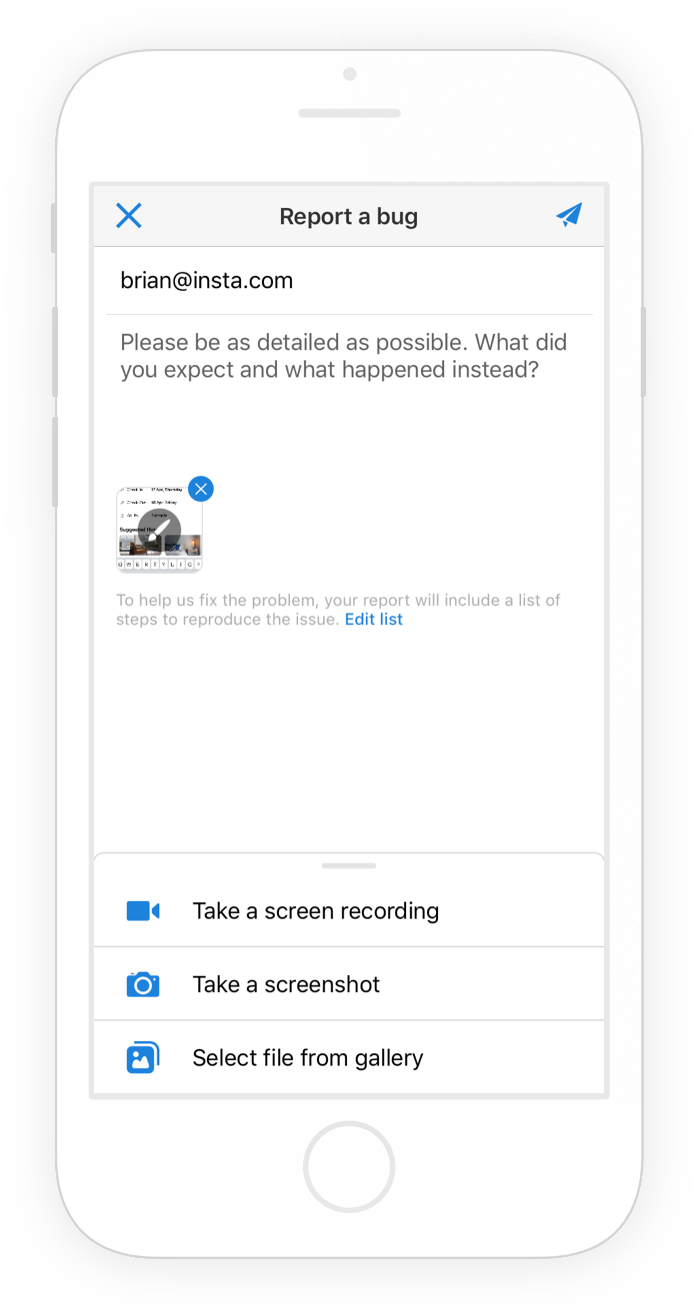
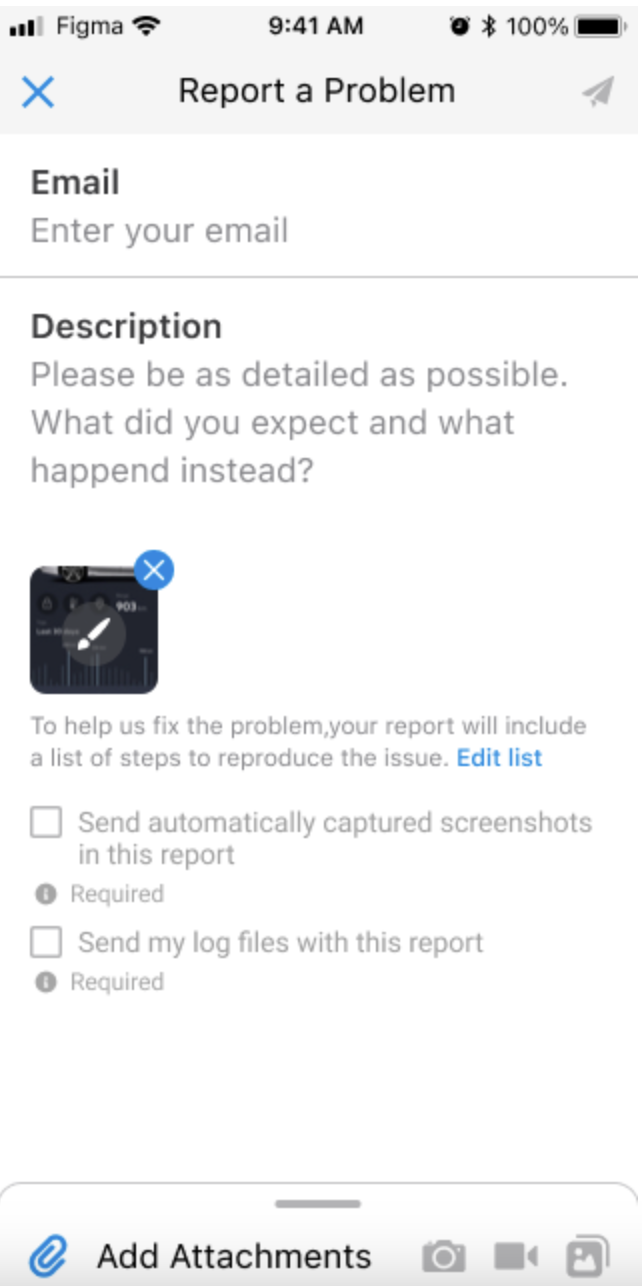
The image below shows the first view that your users see when reporting a bug after [invoking the SDK](https://docs.luciq.ai/ios/setup-luciq-for-ios/setup-bug-reporting/showing-luciq).
The first step of the bug reporting flow that your app users experience.
#### Email Address
By default, your users are required to enter a valid email address to submit a bug or feedback. To allow users to submit bugs and feedback without an email, use the following method.
{% tabs %}
{% tab title="Swift" %}
```swift
BugReporting.bugReportingOptions = [.emailFieldOptional]
```
{% endtab %}
{% tab title="Objective-C" %}
```objective-c
LCQBugReporting.bugReportingOptions = LCQBugReportingOptionEmailFieldOptional;
```
{% endtab %}
{% endtabs %}
You can also remove the email field from the UI completely using the following API.
{% tabs %}
{% tab title="Swift" %}
```swift
BugReporting.bugReportingOptions = [.emailFieldHidden]
```
{% endtab %}
{% tab title="Objective-C" %}
```objective-c
LCQBugReporting.bugReportingOptions = LCQBugReportingOptionEmailFieldHidden;
```
{% endtab %}
{% endtabs %}
#### Comment
By default, your app users can submit bugs and feedback without entering a description. To require users to leave a comment before they are able to send bugs or feedback, use the following method.
{% tabs %}
{% tab title="Swift" %}
```swift
BugReporting.bugReportingOptions = [.commentFieldRequired]
```
{% endtab %}
{% tab title="Objective-C" %}
```objective-c
LCQBugReporting.bugReportingOptions = LCQBugReportingOptionCommentFieldRequired;
```
{% endtab %}
{% endtabs %}
You can also set a minimum number of characters as a requirement for the comments field using the API below:
{% tabs %}
{% tab title="Swift" %}
```swift
BugReporting.setCommentMinimumCharacterCount(3, forBugReport: BugReportingReportCategory.bug)
```
{% endtab %}
{% tab title="Objective-C" %}
```objective-c
[LCQBugReporting setCommentMinimumCharacterCount:3 forBugReportType:LCQBugReportingTypeBug];
```
{% endtab %}
{% endtabs %}
### Attachments
Your users can submit two types of attachments with any report: default Luciq attachments (files that they can select from their device) and custom extra attachments (additional files that you can attach using code).
#### Luciq Attachments
When your app users invoke Luciq, the SDK automatically captures a screenshot of their current view. This is the default attachment that is sent with any report. Your users can annotate this screenshot by drawing on, magnifying, or blurring specific parts.
In addition, there are other attachment types that your users can choose to send with each report. All attachment types can be enabled or disabled.
The attachment options are:
* Extra screenshots
* Images from photo library
* Screen recording
All attachment options are enabled by default if they are available in your current [plan](https://www.luciq.ai/pricing).
You can customize the attachment options that are available for your users to send by passing its corresponding enum value as an argument in the following API call.
{% tabs %}
{% tab title="Swift" %}
```swift
BugReporting.enabledAttachmentTypes = [.screenShot, .screenRecording]
```
{% endtab %}
{% tab title="Objective-C" %}
```objective-c
LCQBugReporting.enabledAttachmentTypes = LCQAttachmentTypeScreenShot | LCQAttachmentTypeScreenRecording;
```
{% endtab %}
{% endtabs %}
Here are the possible enum values.
{% tabs %}
{% tab title="Swift" %}
```swift
.extraScreenShot
.galleryImage
.screenRecording
.screenShot
```
{% endtab %}
{% tab title="Objective-C" %}
```objective-c
LCQAttachmentTypeScreenshot;
LCQAttachmentTypeExtraScreenshot;
LCQAttachmentTypeGalleryImage;
LCQAttachmentTypeScreenRecording;
```
{% endtab %}
{% endtabs %}
#### Extra Attachments
You can also attach up to three custom files to reports, each up to 5MB.
Use the following method to add a new file attachment.
{% tabs %}
{% tab title="Swift" %}
```swift
.let url = URL(fileURLWithPath: "filePath")
Luciq.addFileAttachment(with: url)
```
{% endtab %}
{% tab title="Objective-C" %}
```objective-c
NSURL *url = [NSURL fileURLWithPath:@"filePath"];
[Luciq addFileAttachmentWithURL:url];
```
{% endtab %}
{% endtabs %}
A new copy of the file at `fileURL` will be attached with each bug and feedback submitted. Extra files are only copied when reports are sent, so you can safely call this API whenever files are available on disk, and the copies attached to your reports will always contain the latest changes at the time of sending.
Alternatively, you can pass data directly as bytes using the API below:
{% tabs %}
{% tab title="Swift" %}
```swift
Luciq.addFileAttachment(with: data, andName: "attachment_1.log")
//Name field is optional
```
{% endtab %}
{% tab title="Objective-C" %}
```objective-c
NSData *data = [[NSData alloc] init];
[Luciq addFileAttachmentWithData:data andName:@"attachment_1.log"];
//Name field is optional
```
{% endtab %}
{% endtabs %}
If more than three files are attached, the API overrides the first file. The file also has to be available locally at the provided path when the report is being sent.
To clear the list of files to be attached, use the method below. This method doesn't delete any files from the local file system. It just removes them from the list of attachments for each report.
{% tabs %}
{% tab title="Swift" %}
```swift
Luciq.clearFileAttachments()
```
{% endtab %}
{% tab title="Objective-C" %}
```objective-c
[Luciq clearFileAttachments];
```
{% endtab %}
{% endtabs %}
#### Private View
You can make any view private so that it's hidden when a screenshot is taken. This completely hides any user data; any private view will appear with a black box covering it in any screenshot automatically. To make a view private, you use the following API.
{% tabs %}
{% tab title="Swift" %}
```swift
view.luciq_privateView = true
```
{% endtab %}
{% tab title="Objective-C" %}
```objective-c
view.luciq_privateView = YES;
```
{% endtab %}
{% endtabs %}
### Auto Screen Recording
{% hint style="info" %}
**Used for Internal Testing**
The main purpose behind this feature is to specifically use it for internal testing rather than on production.
{% endhint %}
You can also automatically capture a screen recording of your app up to the last 30 seconds before a report is sent. **By default, this is disabled**. **Your users will also be prompted once the recording starts at the beginning of the session and will have the ability to remove the video from the attachments when sending the report.** The auto screen recording attachment counts towards the limit of 4 attachments in total.
#### Setting Recording Duration
A limit can be set for the total duration of the auto screen recording. By default this is set to 30 seconds, which is also the maximum duration. The API for this is shown below.
{% tabs %}
{% tab title="Swift" %}
```swift
BugReporting.autoScreenRecordingDuration = 30
```
{% endtab %}
{% tab title="Objective-C" %}
```objective-c
LCQBugReporting.autoScreenRecordingDuration = 30;
```
{% endtab %}
{% endtabs %}
#### Disabling/Enabling Auto Screen Recording
If you'd like to enable or disable the auto screen recording feature, you can use the API below.
{% tabs %}
{% tab title="Swift" %}
```swift
BugReporting.autoScreenRecordingEnabled = true
```
{% endtab %}
{% tab title="Objective-C" %}
```objective-c
LCQBugReporting.autoScreenRecordingEnabled = YES;
```
{% endtab %}
{% endtabs %}
### User Consent
{% hint style="info" %}
To use checkboxes, you need a minimum of Luciq iOS version of v12.3.0.
{% endhint %}
{% hint style="info" %}
To use actionable user consents, you need a minimum of Luciq’s iOS SDK version of v13.2.0.
{% endhint %}
You can use the below API to add a checkbox to your bug reporting form. These checkboxes could be used to:
* Ask for the user's consent without the SDK reacting to the user's answer.
* Ask for the user's consent and have the SDK drop specific data based on the user's answer.
The API will help you define:
* **Description**: Text that appears on the end-user's device.
* **Key**: Title that appears on the dashboard.
* **State**: Whether the user input is mandatory or not.
* **Default Value**: Whether the checkbox is checked by default or unchecked by default.
* **Action Type\[Optional]**: If you want the SDK to drop specific data based on the user’s answer to the checkbox, add one value from the below options.
* **Options**:
* **dropAutoCapturedMedia**: Drops all auto-captured media, without dropping the attachments that the user attached manually
* **dropLogs**: Drops all captured logs, whether they were captured automatically or added by the company itself
* **noChat**: Doesn't open a new chat for this specific report and disables the chat functionality on your dashboard for this repot.
{% tabs %}
{% tab title="Swift" %}
```swift
BugReporting.addUserConsent(withKey: <#T##String!#>,
description: <#T##String!#>,
mandatory: <#T##Bool#>,
checked: <#T##Bool#>,
actionType: <#T#ConsentAction#>)
```
{% endtab %}
{% tab title="Objective-C" %}
```objective-c
[LCQBugReporting addUserConsentWithKey:<#(NSString *)#>
description:<#(NSString *)#>
mandatory:<#(BOOL)#>
checked:<#(BOOL)#>
actionType:<#(LCQConsentAction)#>];
```
{% endtab %}
{% endtabs %}
{% columns %}
{% column %}
{% endcolumn %}
{% column %}
{% endcolumn %}
{% endcolumns %}
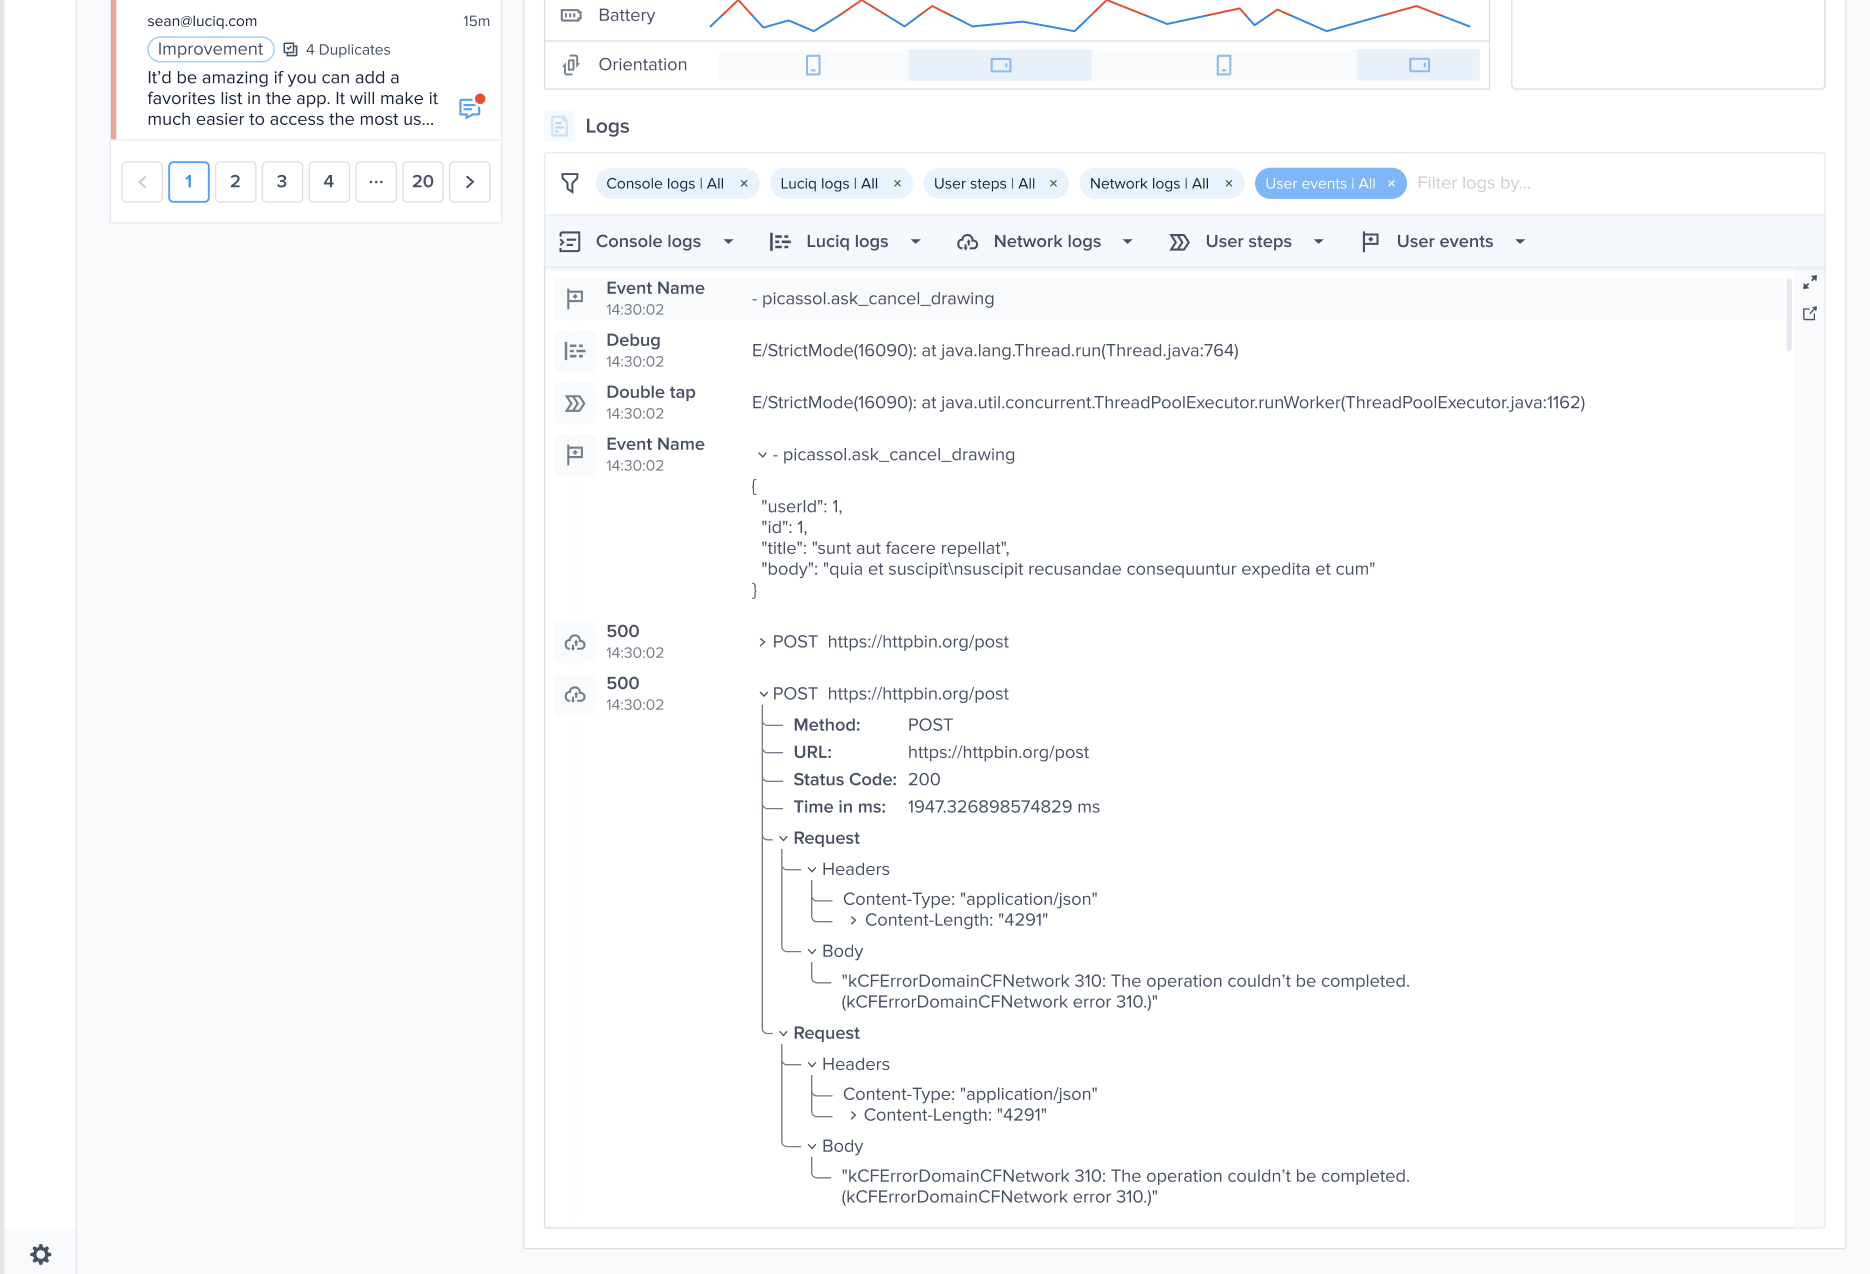
### Logs
A whole host of logs are sent with every report. These logs include:
* **Console Logs:** Default logs that are printed to the console when the application is running.
* **Luciq Logs:** Logs with different verbosity levels that you can add manually.
* **User Steps:** Every step the user has taken in the form of log entries.
* **Repro Steps:** User steps prior to the bug report grouped by view.
* **Network Logs:** A log of each network request.
* **User Events:** A manual log of actions that a user has taken.
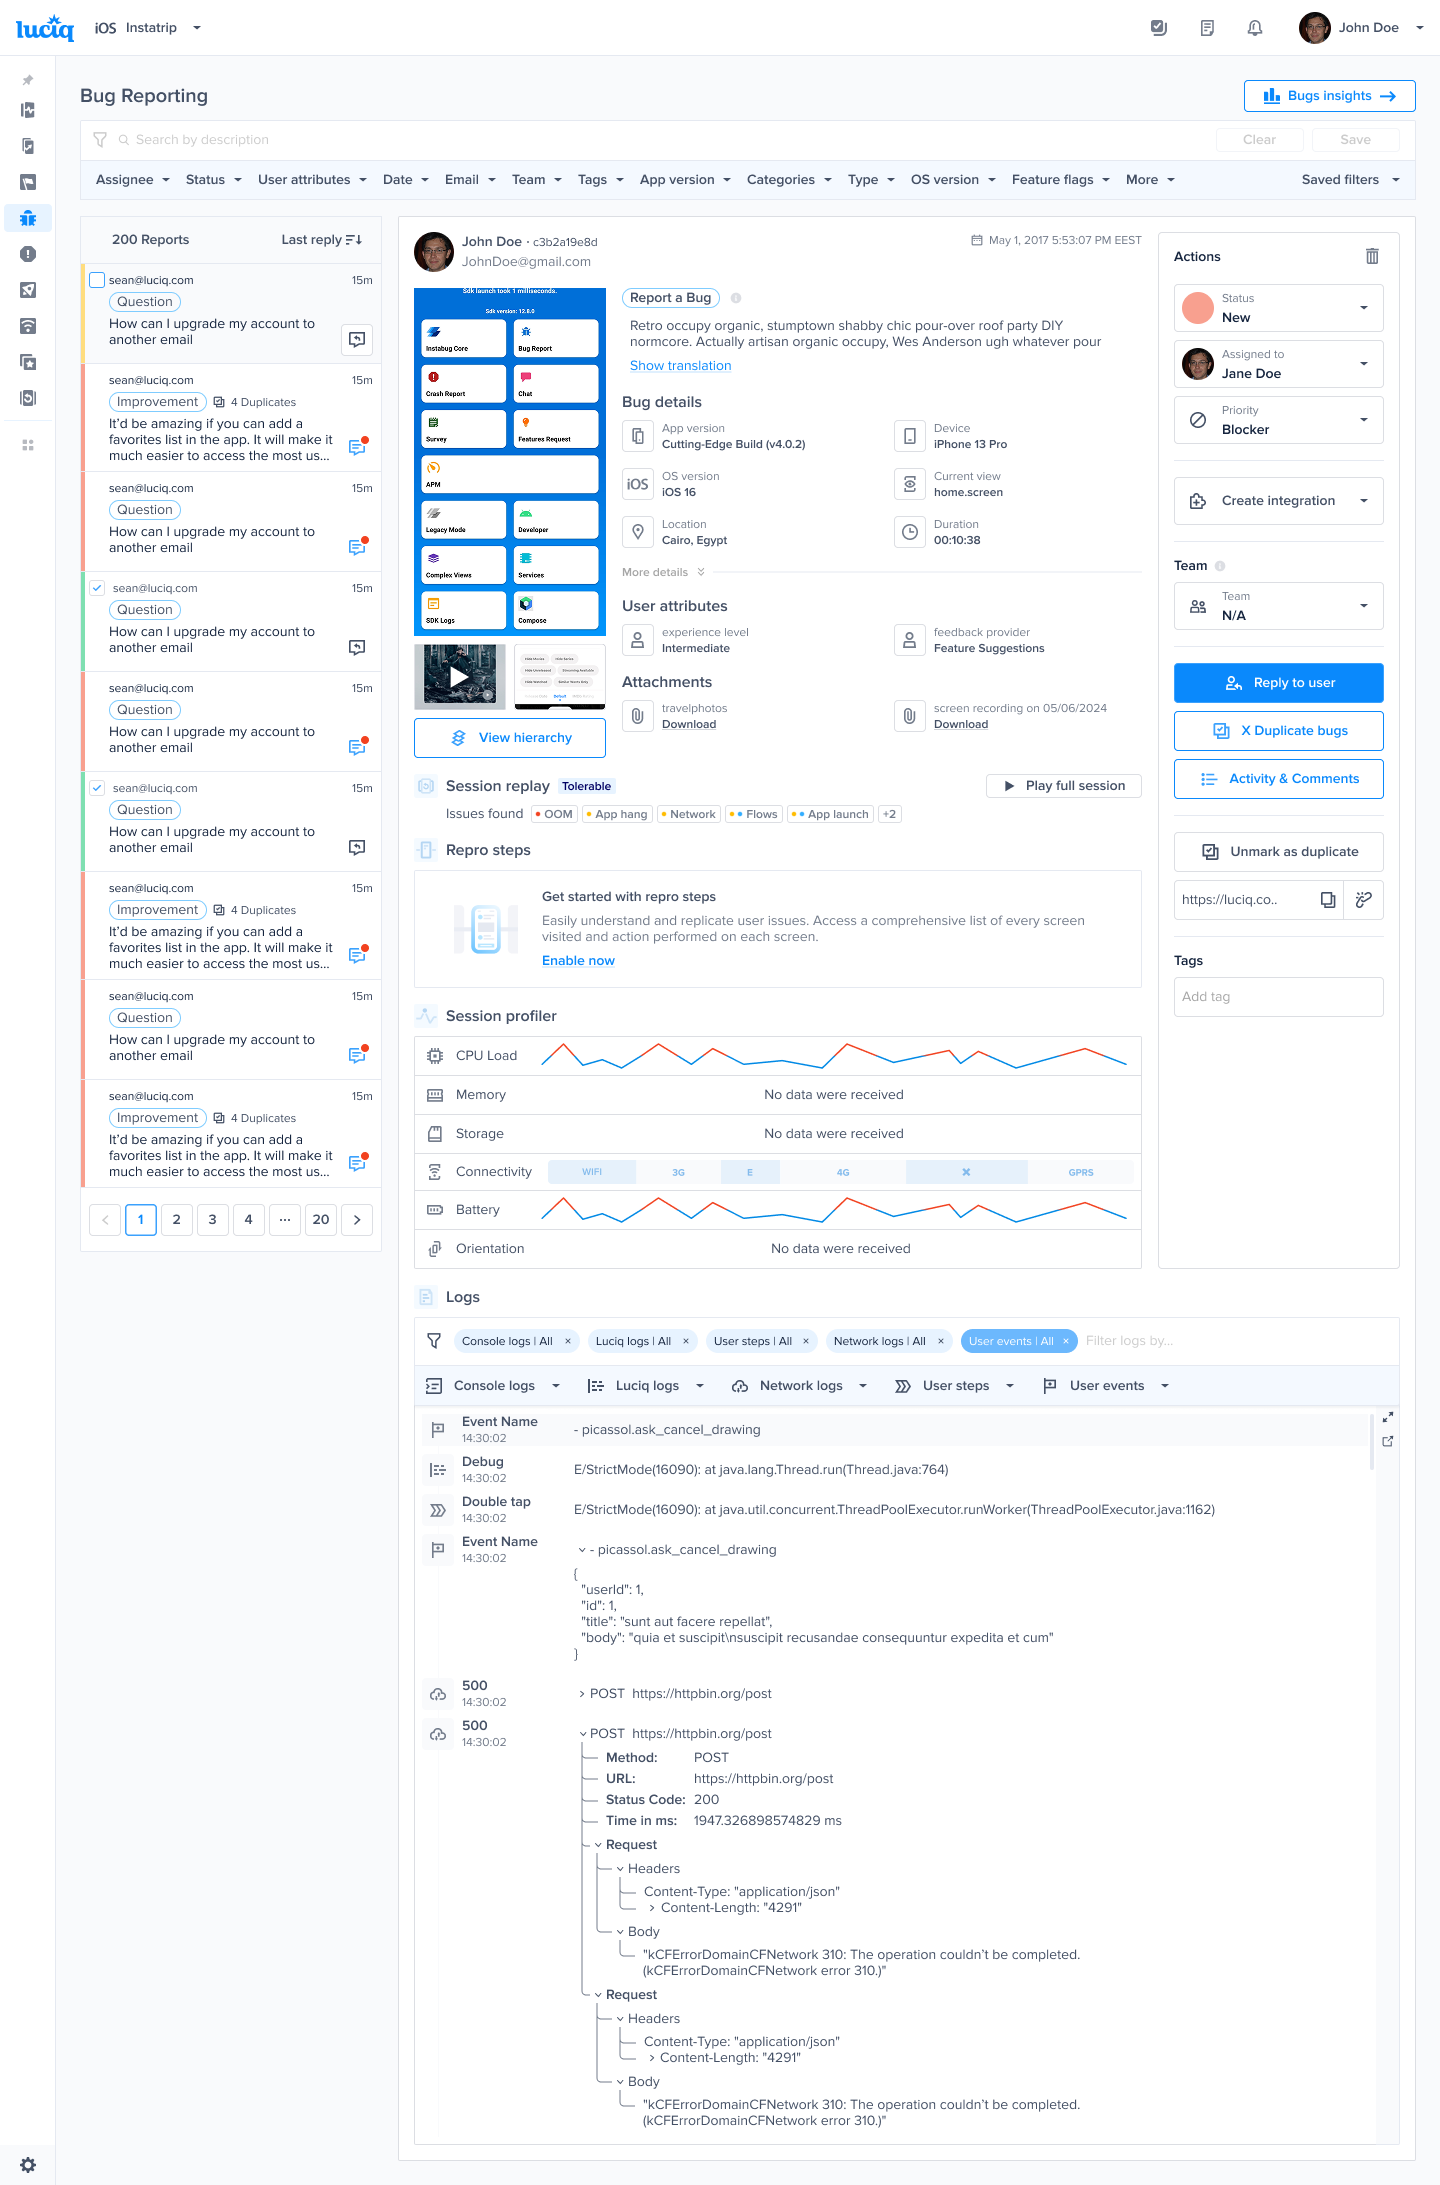
More details regarding logging can be found [here](https://docs.luciq.ai/ios/setup-luciq-for-ios/custom-settings/logs-and-profiling/report-logs). Different log types are enabled depending on your [plan](https://www.luciq.ai/pricing).
An example of the expanded logs view in your dashboard.
### Repro Steps
Repro Steps help you reproduce a bug by displaying your users' actions in each view of your app. With each view, you will find a list of actions that tell you exactly what the user did in that view. More details can be found [here](https://docs.luciq.ai/ios/setup-luciq-for-ios/custom-settings/privacy-settings/repro-steps).
This is enabled by default depending on your [plan](https://www.luciq.ai/pricing).
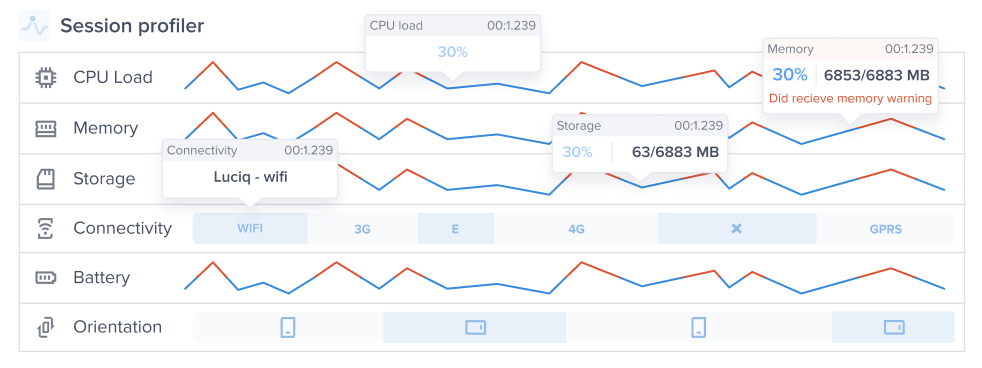
### Session Profiler
With each report, you'll receive a detailed environment profile covering the last 60 seconds before a bug or feedback was submitted. This Session Profiler includes device data like memory load and battery state. This is enabled by default depending on your [plan](https://www.luciq.ai/pricing). More details about the information contained in the Session Profiler can be found [here](https://docs.luciq.ai/ios/setup-luciq-for-ios/custom-settings/logs-and-profiling/session-profiler).
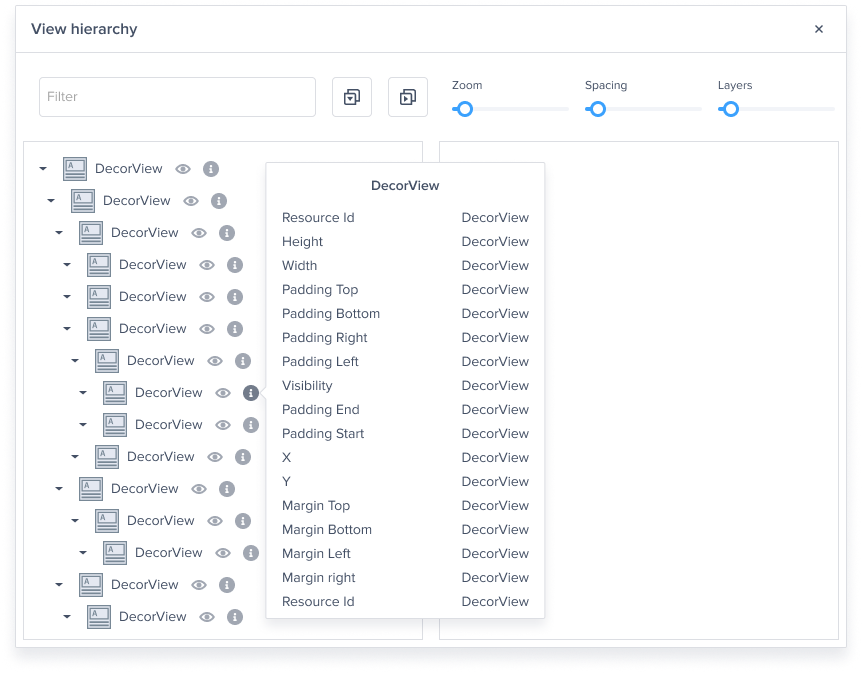
### View Hierarchy
With the View Hierarchy feature, you can visually inspect each layer in your app and see all the properties and constraints of each subview so you can spot errors at a glance.
This feature is critical for investigating UI bugs as it makes the process of finding the problem and fixing it faster and simpler. For example, if you receive a report that a certain UI view is missing, you can use View Hierarchy to easily discover if the missing view is hidden behind a higher layer, out of the parent view's bounds, or missing from the window.
Any editable text or text fields will automatically be replaced with asterisks.
View Hierarchy is disabled by default. If you need to enable View Hierarchy, you can do so as shown in the following example.
{% tabs %}
{% tab title="Swift" %}
```swift
BugReporting.shouldCaptureViewHierarchy = true
```
{% endtab %}
{% tab title="Objective-C" %}
```objective-c
LCQBugReporting.shouldCaptureViewHierarchy = YES;
```
{% endtab %}
{% endtabs %}
{% hint style="warning" %}
**Enabled from SDK version 8.3.0**
The View Hierarchy will only be visible for reports coming from an application running a minimum SDK version of 8.3.0.
{% endhint %}
### Disclaimer Text
Within the bug reporting form, you can add a disclaimer text with hyperlinked text in case you'd like to redirect users to a different page in the event that they click on a specific text (for example, if you'd like to hyperlink your privacy policy).
{% tabs %}
{% tab title="Swift" %}
```swift
BugReporting.setDisclaimerText("Luciq can help developers produce more quality code. [Learn more](https://www.luciq.ai) and [more](http://string-functions.com/length.aspx).")
```
{% endtab %}
{% tab title="Objective-C" %}
```objective-c
[LCQBugReporting setDisclaimerText:@"Luciq can help developers produce more quality code. [Learn more](https://www.luciq.ai) and [more](http://string-functions.com/length.aspx)."];
```
{% endtab %}
{% endtabs %}
### Tags
You can add tags to the reports you receive to help you filter and triage bugs in your dashboard. More details regarding tags can be found [here](https://docs.luciq.ai/docs/ios-set-custom-data#section-tags).
---
# Agent Instructions
This documentation is published with GitBook. GitBook is the documentation platform designed so that both humans and AI agents can read, navigate, and reason over technical content effectively. Learn more at gitbook.com.
## Querying This Documentation
If you need additional information that is not directly available in this page, you can query the documentation dynamically by asking a question.
Perform an HTTP GET request on the current page URL with the `ask` query parameter, and the optional `goal` query parameter:
```
GET https://docs.luciq.ai/ios/setup-luciq-for-ios/setup-bug-reporting/customize-report-fields.md?ask=&goal=
```
`ask` is the immediate question: it should be specific, self-contained, and written in natural language.
`goal` is optional and describes the broader end goal you are ultimately trying to accomplish on behalf of the user. GitBook uses it to tailor the answer towards what is most useful for that goal.
The response will contain a direct answer to the question and relevant excerpts and sources from the documentation.
Use this mechanism when the answer is not explicitly present in the current page, you need clarification or additional context, or you want to retrieve related documentation sections.