

Deobfuscation for Android
This guide explains how to deobfuscate crashes in your Android apps to get fully readable stack traces for Java, Kotlin and C++.
Deobfuscation requires uploading the ProGuard/R8 mapping files (mapping.txt) and .so corresponding to your release builds.
Deobfuscating Java/Kotlin Crashes
You can upload mapping files using one of these ways:
Manually via the Luciq Dashboard
Automated via Gradle Plugin (Straightforward & Recommended)
Automated via Script
Automated via API
Recovering Mapping Files from Google Play Console
When uploading your .aab to the Google Play Console (or any other store), it's a good practice to keep a backup of the mapping file in case automated upload methods fail.
If you need to upload the mapping file after the AAB has already been published, you can still retrieve it from the Google Play Console by following these steps:
Go to Google Play Console → Test and release → Production
Open App bundles and select Details

Download the published app bundle

Rename the file from app-release.aab to app-release.zip then extract the ZIP file
Navigate to:
BUNDLE-METADATA/com.android.tools.build.obfuscation/Locate the proguard.map file then rename it to proguard.txt
Upload the file manually via the Luciq Dashboard
This allows you to recover and upload the correct mapping file even after your app has already been released.
1. Uploading Manually via the Dashboard
Open your Luciq Dashboard.
Go to Settings → Upload Mapping Files.
Upload your mapping.txt file.
Multiple mapping files can be uploaded for different app versions.

2. Uploading via Gradle Plugin
Using the Luciq plugin ensures that mapping files are uploaded automatically.
If you're using Gradle Version Catalog TOML, please check out this page for adding 'luciq-plugin'.
Step 1: Add the Plugin to your buildscript
Step 2: Apply the plugin in your app module
Add apply plugin: 'luciq-crash' to your app's Gradle file.
Step 3: Configure the plugin
Ready to go example:
Full example:
This ensures mapping files are uploaded automatically during your build process.
3. Uploading via Script
Automating uploads ensures that mapping files are uploaded every time a release build is generated.
Step 1: Create the Upload Script
Create a file called upload_mapping.sh at the root of your project:
Step 2: Add the Gradle Task
Add the following to your app module's build.gradle (Groovy DSL):
Notes:
Use absolute paths (
${rootDir}) for the script.Mapping files are generated only after assembling a release variant.
Step 3: Run the Task
First, build your release variant:
./gradlew :app:assembleRelease
Then upload the mapping file:
./gradlew :app:uploadMappingFiles
Tip: For CI/CD, you can attach the upload task directly to the release build to ensure mapping files always exist.
4. Uploading via API
You can also upload mapping files directly via API. Mapping files must be uploaded as a .txt file.
Deobfuscating NDK/C++ Crashes
By default, native crashes are obfuscated. In order to deobfuscate them, you'll need to upload the relevant .so files and we'll take care of the rest.
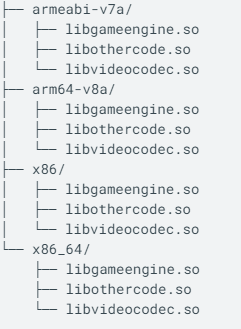
Locating .so Files
The .so files are usually found in specific directories related to the different app architectures. You can find below the different files, as well as their related architecture.
Uploading Manually via the Dashboard
Once you have the .so files, you can upload them directly to the dashboard through Upload NDK DSYMs page found in the Settings menu of your Luciq dashboard. You'll only need to upload the file, while selecting the correct app version and app architecture.

Uploading via API
We have an API endpoint that you can use to upload your symbol files directly from the console or from the CI.
Please contact support to obtain your API Key
Last updated