# Setup Push Notifications
### Push Notifications
You can enable Luciq to send your users push notifications each time you send them a new message.
#### Push Notification Key
Follow the steps below to upload your push certificate to your Luciq dashboard.
1. Go to the **Push Notifications** page on your Luciq dashboard and add you `API_KEY`.
2. Make sure to select whether the `API_KEY` you're adding is for development or production.
#### Setting Your App to Handle Luciq Notifications
Pass the push notification registration token you get to Luciq.
{% tabs %}
{% tab title="Kotlin" %}
{% code overflow="wrap" %}
```kotlin
Replies.setPushNotificationRegistrationToken("PUSH_NOTIFICATION_TOKEN")
```
{% endcode %}
{% endtab %}
{% tab title="Java" %}
{% code overflow="wrap" %}
```java
Replies.setPushNotificationRegistrationToken("PUSH_NOTIFICATION_TOKEN");
```
{% endcode %}
{% endtab %}
{% endtabs %}
When you receive a notification, check if it's an Luciq notification, then pass it to Luciq if necessary.
{% tabs %}
{% tab title="Kotlin" %}
{% code overflow="wrap" %}
```kotlin
if(Replies.isLuciqNotification(data)){
//Shown notification related to Luciq
Replies.showNotification(data)
}
```
{% endcode %}
{% endtab %}
{% tab title="Java" %}
{% code overflow="wrap" %}
```java
if(Replies.isLuciqNotification(data)){
//Shown notification related to Luciq
Replies.showNotification(data);
}
```
{% endcode %}
{% endtab %}
{% endtabs %}
#### Notification Channel ID
You can use channels to group the incoming Luciq notifications into a manageable group. To do this, you simply need to pass the channel ID to the below API.
{% tabs %}
{% tab title="Kotlin" %}
{% code overflow="wrap" %}
```kotlin
Replies.setPushNotificationChannelId(String pushNotificationChannelId)
```
{% endcode %}
{% endtab %}
{% tab title="Java" %}
{% code overflow="wrap" %}
```java
Replies.setPushNotificationChannelId(String pushNotificationChannelId);
```
{% endcode %}
{% endtab %}
{% endtabs %}
### Notification Icon
The icon that is shown with each push notification can be changed to match your application's icon. The API below can be used to change this icon.
{% tabs %}
{% tab title="Kotlin" %}
{% code overflow="wrap" %}
```kotlin
Replies.setNotificationIcon(@DrawableRes int notificationIcon)
```
{% endcode %}
{% endtab %}
{% tab title="Java" %}
{% code overflow="wrap" %}
```java
Replies.setNotificationIcon(@DrawableRes int notificationIcon);
```
{% endcode %}
{% endtab %}
{% endtabs %}
#### Disabling Push Notifications
Push notifications are enabled by default if you upload a push certificate to your Luciq dashboard. To disable them, modify your builder method as in the following example.
{% tabs %}
{% tab title="Kotlin" %}
{% code overflow="wrap" %}
```kotlin
Replies.setPushNotificationState(Feature.State.DISABLED)
```
{% endcode %}
{% endtab %}
{% tab title="Java" %}
{% code overflow="wrap" %}
```java
Replies.setPushNotificationState(Feature.State.DISABLED);
```
{% endcode %}
{% endtab %}
{% endtabs %}
#### In-App Notifications
By default, a notification will be shown on top of your app's UI when a new message is received.
{% hint style="info" %}
**Email Notifications**
If your user doesn't view the new message within 10 minutes, they will be sent an email notification as well.
{% endhint %}
#### Disabling In-App Notifications
Use the following method to disable notifications that appear in-app.
{% tabs %}
{% tab title="Kotlin" %}
{% code overflow="wrap" %}
```kotlin
Replies.setInAppNotificationEnabled(false)
```
{% endcode %}
{% endtab %}
{% tab title="Java" %}
{% code overflow="wrap" %}
```java
Replies.setInAppNotificationEnabled(false);
```
{% endcode %}
{% endtab %}
{% endtabs %}
#### In-App Notification Sound
When your app users receive an in-app notification through Luciq, sound is enabled by default. However, you can disable it by using the following method.
{% tabs %}
{% tab title="Kotlin" %}
{% code overflow="wrap" %}
```kotlin
Replies.setInAppNotificationEnabled(false)
```
{% endcode %}
{% endtab %}
{% tab title="Java" %}
{% code overflow="wrap" %}
```java
Replies.setInAppNotificationSound(false);
```
{% endcode %}
{% endtab %}
{% endtabs %}
#### System Notification Sound
System notification sound is disabled by default. You can enable it by adding the following method to Luciq builder.
{% tabs %}
{% tab title="Kotlin" %}
{% code overflow="wrap" %}
```kotlin
Replies.setSystemReplyNotificationSoundEnabled(true)
```
{% endcode %}
{% endtab %}
{% tab title="Java" %}
{% code overflow="wrap" %}
```java
Replies.setSystemReplyNotificationSoundEnabled(true);
```
{% endcode %}
{% endtab %}
{% endtabs %}
#### Conversation Sound
When your app users receive a new in-app chat in a conversation with you, sound is also enabled by default. You can disable it by adding the following method to Luciq builder.
{% tabs %}
{% tab title="Kotlin" %}
{% code overflow="wrap" %}
```kotlin
Replies.setShouldPlayConversationSounds(false)
```
{% endcode %}
{% endtab %}
{% tab title="Java" %}
{% code overflow="wrap" %}
```java
Replies.setShouldPlayConversationSounds(false);
```
{% endcode %}
{% endtab %}
{% endtabs %}
#### Get Unread Messages Count
You can use the following method to get the number of messages the user has yet to read.
{% tabs %}
{% tab title="Kotlin" %}
{% code overflow="wrap" %}
```kotlin
Replies.getUnreadRepliesCount();
```
{% endcode %}
{% endtab %}
{% tab title="Java" %}
{% code overflow="wrap" %}
```java
Replies.getUnreadRepliesCount()
```
{% endcode %}
{% endtab %}
{% endtabs %}
#### Upload Service Account File
Google has announced the deprecation of the old FCM APIs that are used for Push Notifications. To ensure better performance and user experience, it is imperative to migrate to the HTTPv1 APIs.
{% hint style="warning" %}
This upgrade will also involve a change in the method of authorization, shifting from using api\_key to using a service-account.json file. The steps below provide a detailed guide on how to perform this migration to avoid any service interruption.
{% endhint %}
#### Prepare the service-account.json from Firebase
1. Go to your Firebase Projects Page by navigating to the [Firebase Console](https://console.firebase.google.com/).
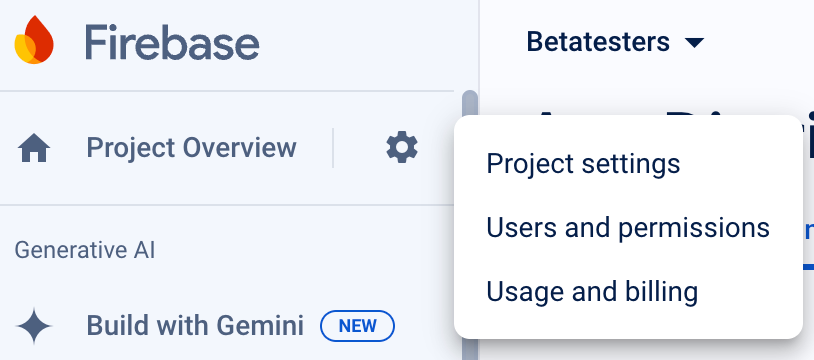
2. Select your project from the Firebase console landing page, then select the project you want to update.
3. Access your project settings by clicking on the gear icon next to the project name to open Project Settings.
4. Generate a new private key by doing the following:
1. Go to the **Service Accounts** tab
2. Click on the **Generate new private key** button
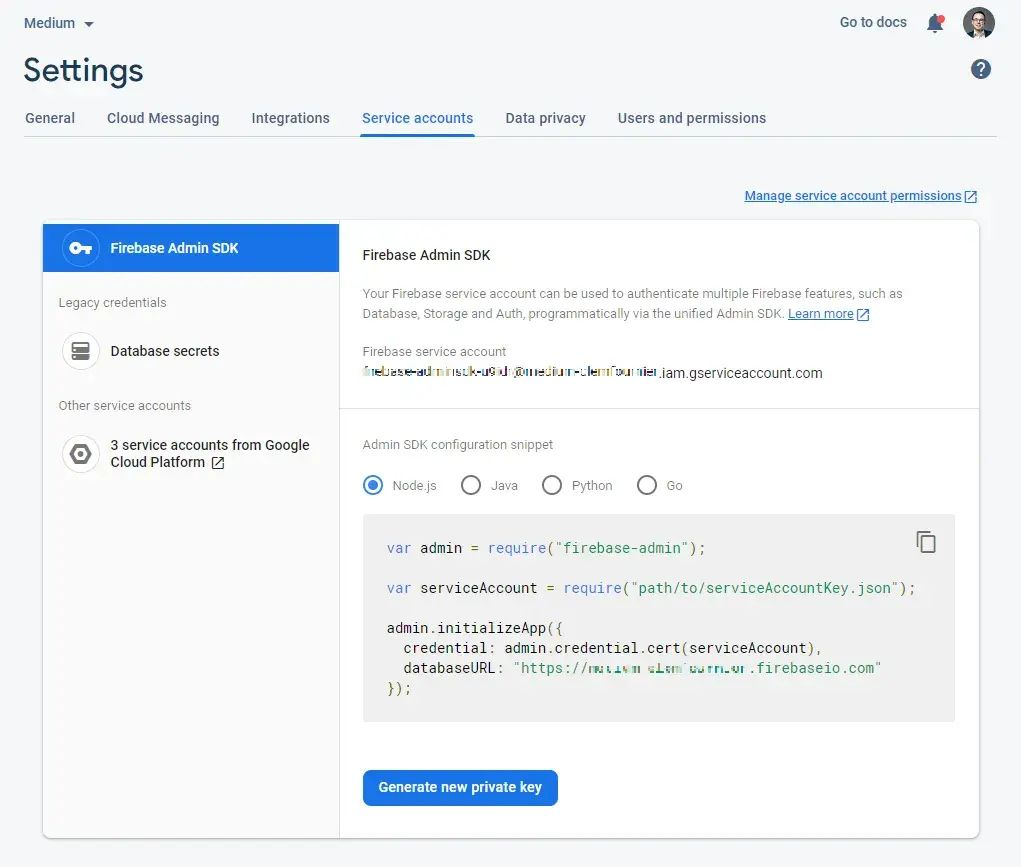
{% hint style="info" %}
**Confirming your action**
A file named \-firebase-adminsdk-\.json will be downloaded. This is your service-account.json file.
{% endhint %}
#### Configure Push Notifications in Luciq Dashboard
1. Select the App and Environment you need to configure push notifications for.
2. Navigate to Settings by clicking on Settings in the left sidebar.
3. Under the settings menu, select Push Notification Settings.
4. Upload the service-account.json file you obtained from Firebase in the previous steps.
5. Update to the latest Luciq SDK version to leverage the new push notification features.
---
# Agent Instructions: Querying This Documentation
If you need additional information that is not directly available in this page, you can query the documentation dynamically by asking a question.
Perform an HTTP GET request on the current page URL with the `ask` query parameter:
```
GET https://docs.luciq.ai/android/set-up-luciq-for-android/setup-push-notifications.md?ask=
```
The question should be specific, self-contained, and written in natural language.
The response will contain a direct answer to the question and relevant excerpts and sources from the documentation.
Use this mechanism when the answer is not explicitly present in the current page, you need clarification or additional context, or you want to retrieve related documentation sections.