> For the complete documentation index, see [llms.txt](https://docs.luciq.ai/llms.txt). Markdown versions of documentation pages are available by appending `.md` to page URLs; this page is available as [Markdown](https://docs.luciq.ai/ios/setup-luciq-for-ios/custom-settings/privacy-settings/repro-steps.md).
# Repro Steps
Repro Steps is your go-to tool for understanding what led to a bug or crash in your app. This guide will help you make the most of Repro Steps.
#### What are "Repro Steps"?
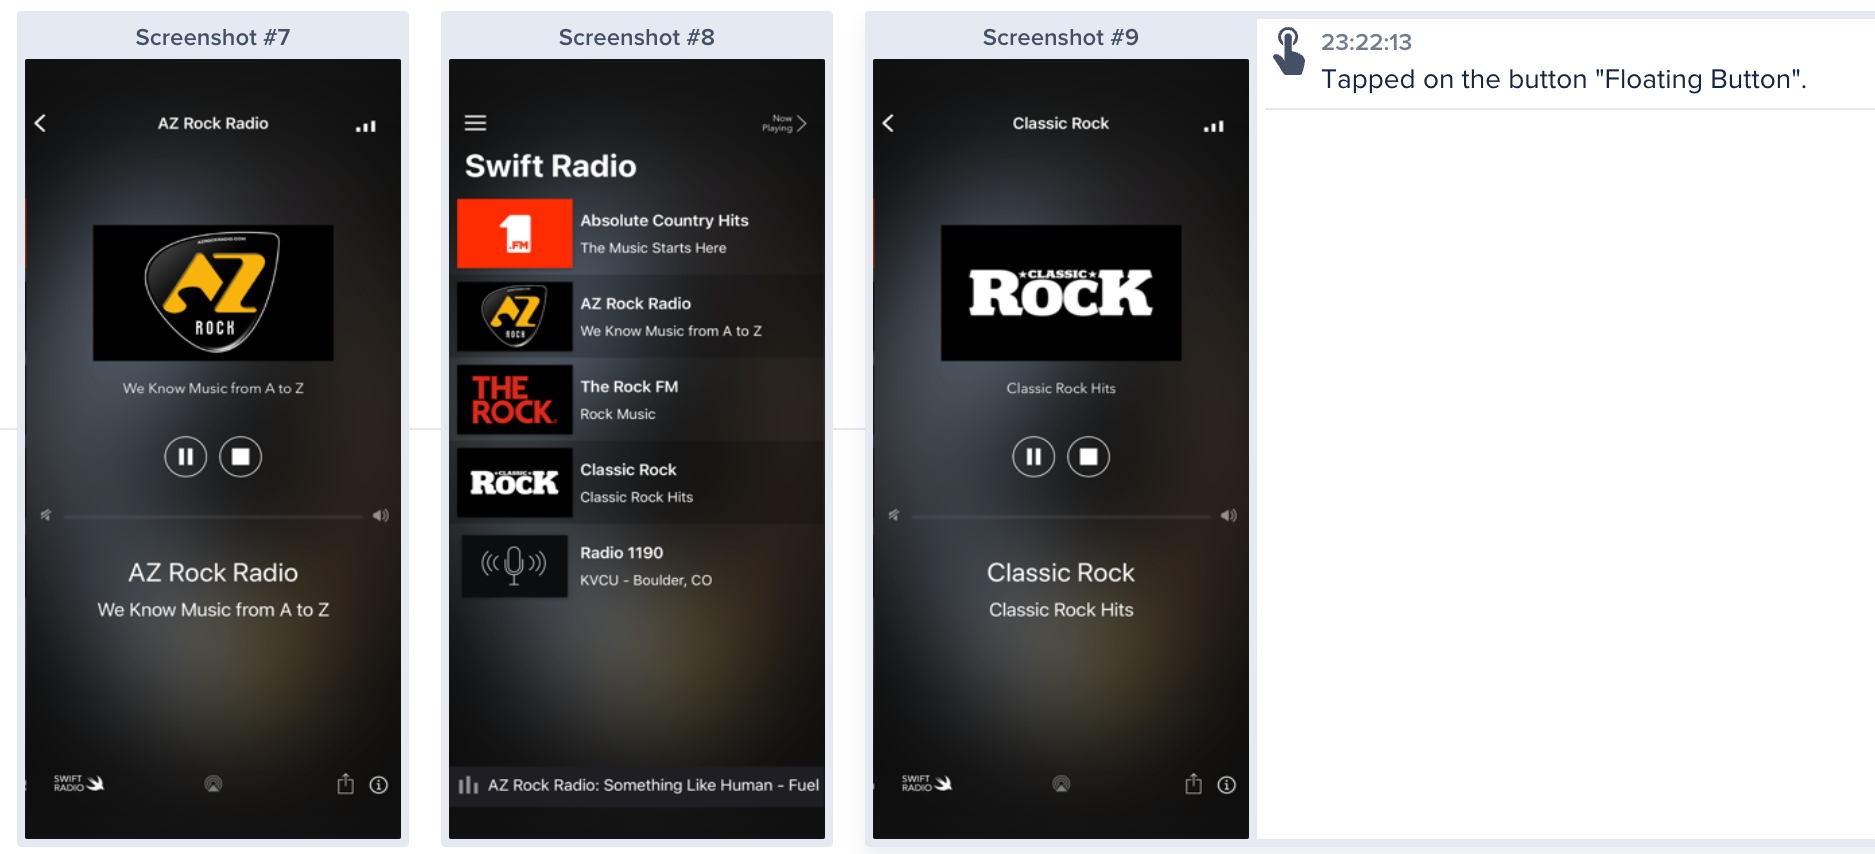
Repro Steps capture and present all the actions a user takes in your app before encountering a bug or crash. These steps are grouped by the app view, and you can view user steps alongside relevant screenshots. It's like having a play-by-play visual and written record of the user's actions leading to the problem.
Repro steps captured by Luciq
#### Where can you find "Repro Steps"?
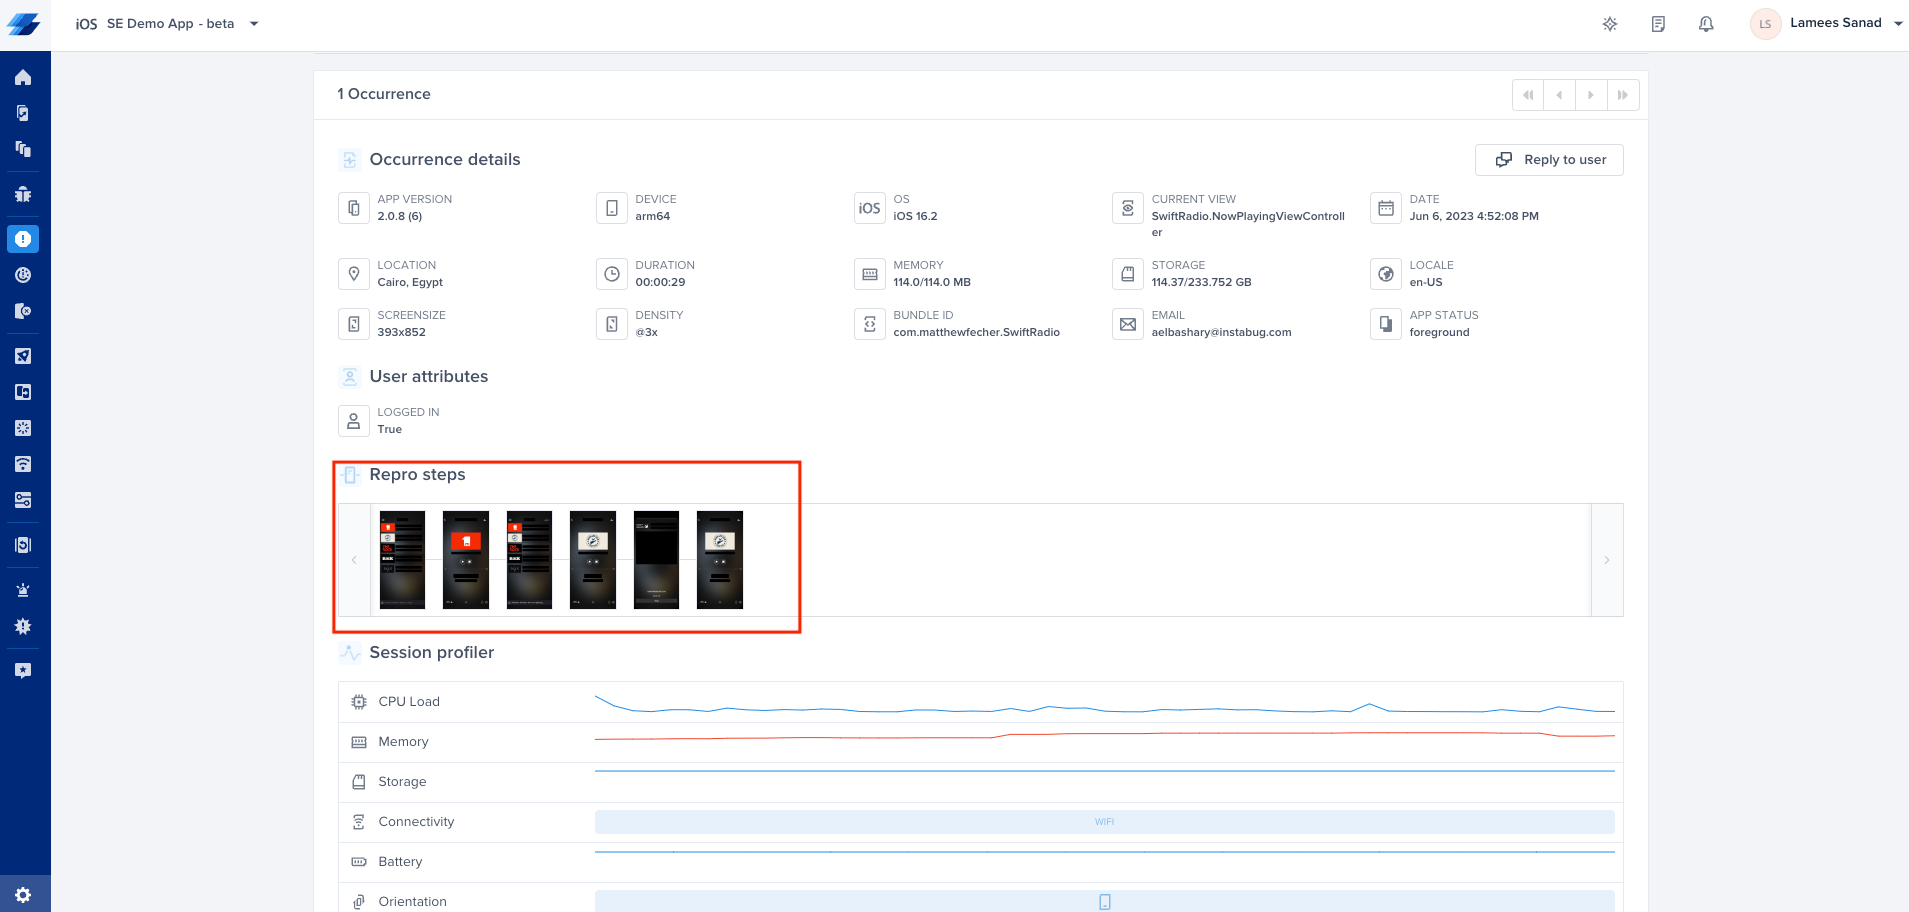
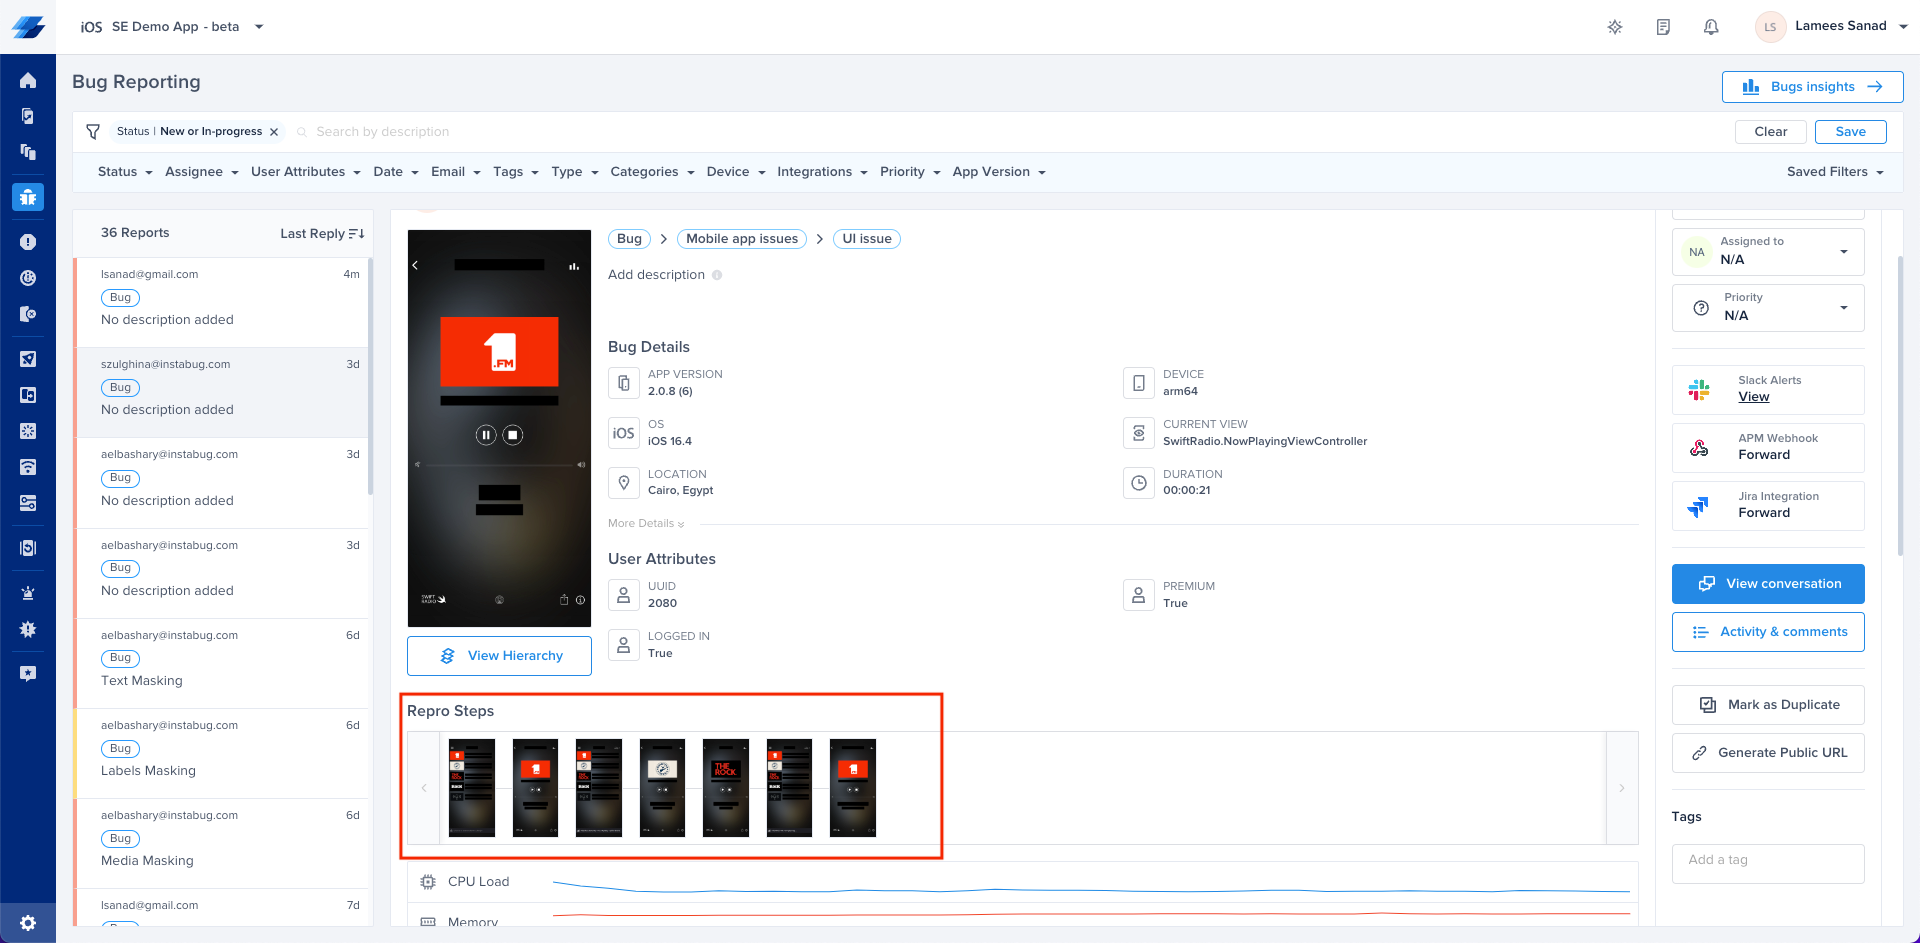
To find the Repro Steps, simply scroll down below the bug details. If you are on the crash reporting tool, you will find them in the occurrences page of a crash below the crash details. Check the screenshot below to find them
Location of Reprosteps inside a Crash Report
Location of Reprosteps inside a Bug Report
#### Understanding the Setup
Repro Steps are organized by the different screens in your app that users interact with. Each screen view visited by the user contains a set of chronological steps, giving you a clear picture of what led to the reported issue.
#### Understanding Logged Data and Captured Events
Logged data captures user interactions, such as swipes, scrolls, taps, and more. It provides insights into how users engage with your app. The captured events track app states, including background/foreground transitions, activity changes, and memory warnings.
#### Auto Masking
The default value is `webViews`. Starting from SDK version **19.2.0**, WebViews are masked by default in screenshots to protect potentially sensitive content.
#### Redacting View Content in User Steps and Repro Steps
Starting from SDK version **19.7.0**, you can use `Luciq.viewsContentCaptureEnabled` as a master privacy flag that controls whether User Steps and Repro Steps capture view content (titles, labels, text). When disabled, captured events still fire with the gesture, view class, and screen name. User Steps omit captured view labels, while Repro Steps replace view text and labels with non-identifying descriptors such as `"a button"`, `"a text"`, or `"an image"`, the same descriptors used by [`UIView.luciq_privateView`](/ios/setup-luciq-for-ios/custom-settings/privacy-settings/private-views.md).
By default, `viewsContentCaptureEnabled` is `true`. Set it to `false` to redact view content from User Steps and Repro Steps.
{% tabs %}
{% tab title="Swift" %}
{% code overflow="wrap" %}
```swift
Luciq.viewsContentCaptureEnabled = false
```
{% endcode %}
{% endtab %}
{% tab title="Objective-C" %}
{% code overflow="wrap" %}
```objectivec
[Luciq setViewsContentCaptureEnabled:NO];
```
{% endcode %}
{% endtab %}
{% endtabs %}
{% hint style="info" %}
#### Scope and behavior
* Affects only User Steps and Repro Steps view content: User Steps labels are omitted, and Repro Steps labels use non-identifying descriptors. It does not affect Session Replay screenshots or bug-report screenshots — use the [auto-masking APIs](/ios/setup-luciq-for-ios/custom-settings/privacy-settings/user-privacy.md) for those.
* Stored in memory for the current process and does not survive app restarts.
* Can be set before `Luciq.start(withToken:invocationEvents:)` so the value is applied as soon as automatic capture starts.
* Applies to events captured after the call. Previously-recorded steps are not retroactively redacted.
{% endhint %}
#### How can you enable Repro steps?
Repro Steps is by default enabled with screenshots for bug reporting, and enabled without screenshots for crash reporting. So do you need to change anything here? If yes, you can use the following properties:
{% tabs %}
{% tab title="Swift" %}
{% code overflow="wrap" %}
```swift
Luciq.setReproStepsFor(.all, with: .enable)
```
{% endcode %}
{% endtab %}
{% tab title="Objective-C" %}
{% code overflow="wrap" %}
```objectivec
[Luciq setReproStepsFor:LCQIssueTypeAll withMode:LCQUserStepsModeEnable];
```
{% endcode %}
{% endtab %}
{% endtabs %}
You can change the value of the Issue Type.
{% tabs %}
{% tab title="Swift" %}
{% code overflow="wrap" %}
```swift
//Bug Reporting and Crash Reporting
.all
//Bug Reporting Only
.bug
//Crash Reporting Only
.crash
```
{% endcode %}
{% endtab %}
{% tab title="Objective-C" %}
{% code overflow="wrap" %}
```objectivec
//Bug Reporting and Crash Reporting
LCQIssueTypeAll
//Bug Reporting Only
LCQIssueTypeBug
//Crash Reporting Only
LCQIssueTypeCrash
```
{% endcode %}
{% endtab %}
{% endtabs %}
You can change the value of the User Steps Mode.
{% tabs %}
{% tab title="Swift" %}
{% code overflow="wrap" %}
```swift
//Enable with Screenshots
.enable
//Enable with NO Screenshots
.enabledWithNoScreenshots
//Disable
.disable
```
{% endcode %}
{% endtab %}
{% tab title="Objective-C" %}
{% code overflow="wrap" %}
```objectivec
//Enable with Screenshots
LCQUserStepsModeEnable
//Enable with NO Screenshots
LCQUserStepsModeEnabledWithNoScreenshots
//Disable
LCQUserStepsModeDisable
```
{% endcode %}
{% endtab %}
{% endtabs %}
### Examples
#### **Enable with Screenshots for both Bug Reporting and Crash Reporting:**
{% tabs %}
{% tab title="Swift" %}
{% code overflow="wrap" %}
```swift
Luciq.setReproStepsFor(.all, with: .enable)
```
{% endcode %}
{% endtab %}
{% tab title="Objective-C" %}
{% code overflow="wrap" %}
```objectivec
[Luciq setReproStepsFor:LCQIssueTypeAll withMode:LCQUserStepsModeEnable];
```
{% endcode %}
{% endtab %}
{% endtabs %}
#### **Enable with No Screenshots for Crash Reporting.**
{% tabs %}
{% tab title="Swift" %}
{% code overflow="wrap" %}
```swift
Luciq.setReproStepsFor(.crash, with: .enabledWithNoScreenshots)
```
{% endcode %}
{% endtab %}
{% tab title="Objective-C" %}
{% code overflow="wrap" %}
```objectivec
[Luciq setReproStepsFor:LCQIssueTypeCrash withMode:LCQUserStepsModeEnabledWithNoScreenshots];
```
{% endcode %}
{% endtab %}
{% endtabs %}
#### **Completely disable for both Bug Reporting and Crash Reporting.**
{% tabs %}
{% tab title="Swift" %}
{% code overflow="wrap" %}
```swift
Luciq.setReproStepsFor(.all, with: .disable)
```
{% endcode %}
{% endtab %}
{% tab title="Objective-C" %}
{% code overflow="wrap" %}
```objectivec
[Luciq setReproStepsFor:LCQIssueTypeAll withMode:LCQUserStepsModeDisable];
```
{% endcode %}
{% endtab %}
{% endtabs %}
---
# Agent Instructions
This documentation is published with GitBook. GitBook is the documentation platform designed so that both humans and AI agents can read, navigate, and reason over technical content effectively. Learn more at gitbook.com.
## Querying This Documentation
If you need additional information that is not directly available in this page, you can query the documentation dynamically by asking a question.
Perform an HTTP GET request on the current page URL with the `ask` query parameter, and the optional `goal` query parameter:
```
GET https://docs.luciq.ai/ios/setup-luciq-for-ios/custom-settings/privacy-settings/repro-steps.md?ask=&goal=
```
`ask` is the immediate question: it should be specific, self-contained, and written in natural language.
`goal` is optional and describes the broader end goal you are ultimately trying to accomplish on behalf of the user. GitBook uses it to tailor the answer towards what is most useful for that goal.
The response will contain a direct answer to the question and relevant excerpts and sources from the documentation.
Use this mechanism when the answer is not explicitly present in the current page, you need clarification or additional context, or you want to retrieve related documentation sections.